Cotton Butterfly

Free background from VintageMadeForYou
Showing posts with label Mini Album. Show all posts

Sunday, 12 April 2015

RE# With “Create With Kathe” For Wednesday 8th April 2015


At this weeks RE# Class we made a Mini Album and some Soda Pop Keyrings.
The Mini Album is based on an Album we made in Class back on 12th March.


Hayley and Brydee chose their own colours, Hayley went with her favourite colour pink, which was a combination of Blushing Bride and Strawberry Slush cardstock, the Brydee went with her favourite colour purple, which was a combo of Wisteria Wonder and Elegant Eggplant cardstock.


Mini Album by Hayley 


Mini Album by Hayley


Mini Album by Hayley


Mini Album by Brydee


Mini Album by Brydee


Mini Album by Brydee

And of course Jen completely changed the project up, and featured her new Chameleon Markers …


Mini Album by Jen


Mini Album by Jen


Mini Album by Jen

For the Soda Pop Keyrings, the girls and I made 4 each.
JorjaRose {without me knowing it} made a whole bunch more for her friends!!!
We used a combination of stamps and stickers, and sealed them with Crystal Effects and a sprinkle of Dazzling Diamonds.
We had to let them set overnight, and the girls came back the next day to pick up their xtra cute keyrings.


At this weeks RE# Class on Wednesday evening 6:30pm>8:30pm, we will be making shabby chic feminine card with the "Moon Lake" stamp set, and a masculine card featuring the "Guy Greetings" and "By The Tide" stamp sets.
Bookings essential!

Thanks for taking the time to stop by, and if you would like to make a Stampin’ Up! purchase online, please head on over  to my Stampin’ Up! website.

Happy craftin’,

Kathe.


Wednesday, 25 March 2015

Guest Blogger: Lynn McNeill With Mini Album …


Lynn and I sat down a couple of weeks ago and made a Mini Album, using the Zutter Bind It All, and Envelope Punch Board.
Lynn spent the next couple of weeks titivating her Album, which was a gift for a lovely friend of hers, and this is the result …


Every page is jam packed with photos, sentiments and pull out tabs with secret messages.
As there were so many personal photos showing Lynn’s friend, I am unable to show you each individual page, but you can see how thick the Album is, and get the general gist, based on the cover, as to how it is decorated through-out the Album


Thanks so much Lynn for sharing this beautiful gift.

Wednesday, 18 March 2015

"Create With Kathe" For Thursday 12th March 2015


I always like to do a mini display each week for my ladies, showing the past weeks Class, the projects I made made during the week, along with the projects for that day.
It always looks so bright and welcoming  …


This week we had lots fun making a Mini Album, featuring the Envelope Punch Board and a cute gift card holder ...

Project 1 Mini Album


This is a mini version of the Album I made on Friday, and features the Stampin' Up! stamp sets "Kinda Eclectic", "Painted Petals" and "Perfect Pennants".


Eight mini envelopes, that started out being 6"x6" are made with the Envelope Punch Board.
The base card for the cover is Soft Sky, which has been stamped in Soft Sky with the leaves from the "Kinda Eclectic" stamp set.
The Watercolour Paper is washed with Aqua Painters and Soft Sky ink, then the the blooms are stamped in Strawberry Slush, with Pear Pizzazz for the stems, and little Pearl Basic Jewels have been added to the centre of the blooms.
Once the Watercolour Paper has dried, the sentiment "Life doesn't have to be perfect to be wonderful" is stamped in Lost Lagoon.  
The Watercolour Paper is then framed with ribbon, before being adhered to the cover.


The cover, back cover, and envelopes are then bound using the Zutter Bind-It-All.
The finishing touches are the ribbons which are tied to the spiral binding, and of course the gorgeous butterflies in Soft Sky and Lost Lagoon cardstock, which have been cut using the "Butterflies" Thinlits.
A third butterfly in Vellum has been punched using the "Elegant Butterfly" Punch.
The little flower has been coloured using Lost Lagoon ink.
Wah-Lah ... "Mini Album" done!

Project 2 "Gift Card Holder"


This card is very economical to make, as it uses 1/2 sheet of Soft Suede cardstock and 1/2 a sheet of Naturals White cardstock, along with a scrap of Designer Series Paper.
Cut 2x Soft Suede and 2x Naturals White cardstock using the "Top Note" Bigz Die.
Trim the faux stitch line off of both of the Natural White cardstock Top Note's.
Featuring the stamp set "An Open Heart", stamp the branch and bird in Memento Tuxedo Black. Colour in using Faber-Castell Watercolour Pencils, and blend with Aqua Painters.
The sentiments "Live with an open heart." and "Thank You" are stamped in Lost Lagoon, as this matches back with the "All Abloom" Designer Series Paper Stack.
Layer and adhere the cardstock over the Soft Suede Top Note's.
A small heart {from the "Itty Bitty Accents Punch Pack"} is punched out of both of the front cover layers, as this gives very cute negative detail.
Both of the birds are stamped again, this time in Versamark, and Clear Stampin' Emboss Powder is then heat set with the Heat Tool.
Pearl Basic Jewels have been added to the centre of the berries.
An Antique Brad is threaded with Venetian Crochet Trim, and is attached to the card, as this gives the card the swing effect.


A pocket is added to the inside piece of Soft Suede cardstock, by cutting another Top Note in DSP, but you only need approximately a 1/4 of the Top Note, so this too is very economical.   The faux stitch line is cut off, then the panel is adhered, so as to form a pocket for a gift card.


The finishing touch is on the reverse of the card, when a smudge of Pear Pizzazz ink has been washed under the feet of the bird to ground it, and a small heart added, in the same DSP colour/pattern.
Wah-lah ... "Gift Card Holder" done!

Thanks for taking the time to stop by, and if you would like to make a Stampin’ Up! purchase online, please head on over  to my Stampin’ Up! website.

Happy craftin’,
Kathe.


Recipe Ingredient List
Stamp Sets : “An Open Heart", "Kinda Eclectic", "Painted Petals", "Perfect Pennants"
Ink Pads : Memento Tuxedo Black, Lost Lagoon, Pear Pizzazz, Soft Sky, Strawberry Slush
Cardstock :  Naturals White, Soft Sky, Soft Suede, Watercolour Paper, "All Abloom" Designer Series Paper Stack, Designer Series Paper, Vellum
Framelits : “Butterflies", "Top Note" Bigz
Punches : Elegant Butterfly, Itty Bitty Accents Punch Pack
Xtras : Antique Brads, Aqua Painters, Pearl Basic Jewels, Seam Binding Ribbon in Soft Sky, Stampin’ Dimensionals, Stampin’ Emboss Powder in Clear, Venetian Crochet Trim


Special Tools : Big Shot, Envelope Punch Board, Heat Tool, Stampin’ Scrub and Stampin’ Cleaner, Stampin Trimmer, Zutter Bind-It-All

Wednesday, 11 March 2015

Altered Butterfly Album ...


Want a sneaky peak at this weeks “Create With Kathe” Class? … well here it is … an “Altered Butterfly Album” that I made earlier this week with my Zutter Bind-It-All.


It has a decorated cover featuring Watercolour Paper and the stamp set “Painted Petals”. The sentiment "Life doesn't have to be perfect to be wonderful" from the "Perfect Pennant" stamp set and stamped in Lost Lagoon.


The Album has 8 pocket envelopes {envelopes were made using the Envelope Punch Board}, which are made to fit 6”x4” photos.


This is a great way to use up your older Designer Series Paper, in this instance I used up my old “Tea For Two” DSPs.

We will be making a slightly smaller version at this weeks “Create With Kathe” Class, so book your place now!

Thanks for taking the time to stop by, and if you would like to make a Stampin’ Up! purchase online, please head on over  to my Stampin’ Up! website.

Happy craftin’,
Kathe.


Recipe Ingredient List
Stamp Sets : Painted Petals”, "Perfect Pennants"
Classic Stampin’ Ink Pads : Lost Lagoon, Pear Pizzazz, Soft Sky, Strawberry Slush
Cardstock :  Lost Lagoon, Soft Sky, Watercolour Paper, Vellum
Framelits : “Butterflies”
Punches : Elegant Butterfly
Ribbons :  Seam Binding in Soft Sky
Xtras :  Rosette from the Artisan Embellishment Kit, Basic Pearl Jewels

Special Tools : Aqua Painters, Big Shot, Envelope Punch Board, Stampin’ Scrub and Stampin’ Cleaner, Stampin Trimmer,  Zutter Bind-It-All

Saturday, 6 September 2014

Hip Hip Hooray Mini Album

Yesterday I had the pleasure of sharing the Hip Hip Hooray Mini Album, designed by Delys Cram, with two of my favourite craft ladies Kay and Bev.
We spent a lovely afternoon crafting … and here is the result …


Left to Right, Bev's, Kathe's and Kay's


By Bev


By Bev


By Bev


By Kay


By Kay


By Kay

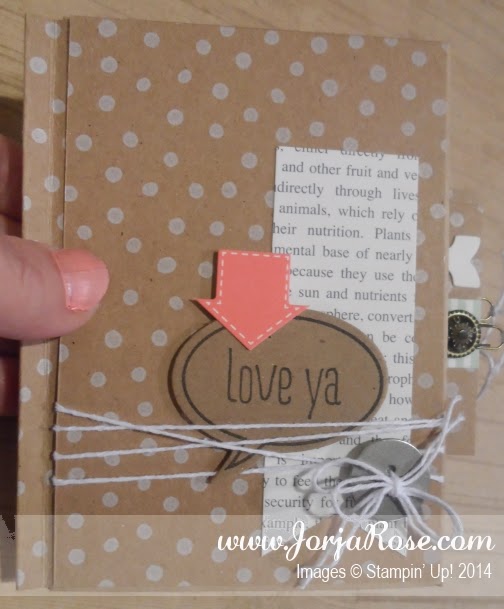
The following photos are from the Mini Album I made ...


The ladies shared a “Hip Hip Hooray Card Kit” {and had heaps of Cards, Envelopes and Stickers left over}.
The Hip Hip Hooray Card Kit Includes 20 printed card bases (10 ea. of 2 designs), 5 sticker sheets, 20 Kraft envelopes, 1 sheet of Stampin’ Dimensionals, 18” Whisper White Baker’s Twine; 10 mini paperclips; 3-piece Hip Hip Hooray Stamp Set & clear block!
Hooray for quick, handcrafted cards!


The only items we needed to add to the project were 3 Brads, a Button, and the sentiment stamped on the cover, which is from the “Just Sayin’” stamp set and matching “Word Bubble” Framelits.


"Just Sayin'" Stamp Set


and matching "Word Bubbles" Framelits

Recipe Ingredient List
Kit : “Hip Hip Hooray Card Kit”
Stamp Sets : “Just Sayin’”
Ink : Early Espresso

Framelits : Word Bubbles

Xtras : Basic Metal Buttons, Antique Brads and/or Candy Dot Brad Bases + coloured Basic Rhinestone Jewels

Special Tools : Big Shot, Magnetic Platform, Small Scallop Stampin’ Trimmer Rotary Cutting Blades, Stampin’ Scrub and Stampin’ Cleaner, Stampin Trimmer, Stampin’ Trimmer Rotary Addition

#CreateWithKathe #JorjaRoseFiles


Related Posts Plugin for WordPress, Blogger...
Pin It
Blogger Wordpress Gadgets