Cotton Butterfly

Free background from VintageMadeForYou
Showing posts with label Tea For Two. Show all posts

Sunday, 11 May 2014

Quilt Card : For Mother’s Day

Well … today in New Zealand we celebrated Mother’s Day.
I made this little number for my Mom-In-Law Nola, whom I adore …


This is the first time I have made a Quilt Card, and it turned out not too shabby {pun intended}!!!


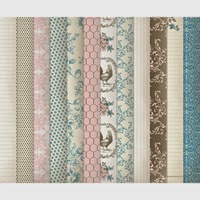
The card base is Naturals White, and the “quilted” cardstock featured is “Tea For Two” Designer Series Paper, available on the Clearance Rack.
The Embossing Folder is the “Square Lattice” Textured Impressions Embossing Folder
The teacup is from the “Tea Shoppe” stamp set, available on My Digital Studio Download. It is in my favourite colour of Old Olive, and fussy cut, then adhered to the Quilt, leaving an opening at the top for the teabag and sentiment note to slip in.
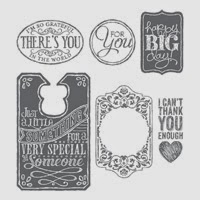
The sentiment is from the “Chalk Talk” stamp set, and is Pear Pizzazz, and the words “I’m so grateful there is you in the world” is hand coloured with Stampin’ markers in Pacific Point and Early Espresso. Layered on Dimensionals, and then stapled to the teabag – yes that is a real teabag and Nola loved it!
Inside the card, the teacups are coloured with Stampin’ Markers L-R Pacific Point, Early Espresso and Old Olive.


The wording “for everything you are to me” is stamped in Old Olive and from the “Petite Pairs” stamp set.
Although I don’t {yet} possess a stamp set with the wording for “Happy Mother’s Day” the wording from these two stamps sets seemed perfect for my Nola!


Quilt Card … done!


Tea For Two” Designer Series Paper, available on the Clearance Rack.


 “Chalk Talk” Stamp Set


“Petite Pairs” Stamp Set


“Tea Shoppe” {My Digital Studio Download}

Recipe Ingredient List
Stamp Sets: “Chalk Talk”, “Petite Pairs” and “Tea Shoppe” {MDS Download}
Ink:  Old Olive, Pear Pizzazz, and Stampin’ Markers Early Espresso, Old Olive, and Pacific Point
Cardstock: Naturals White, “Tea For Two” Designer Series Paper, available on the Clearance Rack.
Punches:  “Extra Large Oval” Punch
Embossing Folders: Square Lattice” Textured Impressions Embossing Folder
Framelits: “Chalk Talk”
Xtras: Dimensionals, Tea-Bag {yes a real Tea-Bag!!!}


Special Tools: Big Shot, Magnetic Platform, Stampin’ Scrub and Stampin’ Cleaner, Stampin’ Trimmer 

Saturday, 19 April 2014

“Create With Kathe” For Thursday 17th April 2014

The day that Cyclone Ita hit!!!
We were smack bang in the middle of craft class, when the 1st power cut hit at 2pm, and we were without power for about 45 minutes.
Luckily we weren't using any electricity other than lighting on today’s project.
The second power cut hit at 8.15pm and fortunately all those that had booked for the evening class had cancelled, as some of the roads were out due to trees falling over!


Thursday’s class we had a full house with Bev, Jenny, Lizzy, Raewyn, Ruth, and Sue in attendance.


We made a cute “Envelope Scrapbook Album”, with the help of my new Zutter!!!


I made 3 samples in advance using Designer Series Paper “Watercolor Wonder”, and retired but available on the Clearance Rack “Beau Château”, “Tea For Two” and this afternoon, because I couldn’t help myself and it’s Easter, I made another using the “Cheerful Treat” DSP!!!


The Stampin’ Up! Envelope Punch Board is used to make 8 envelopes. The cardstock started out as 6”x6” and matched on the Board to make an envelope to fit a 3”x4” card. The first score mark is at 2 5/8”.
Crumb Cake is used for the cover of the Album, and I experimented with stamping in “Sahara Sand” the “En Francais” and “Hardwood” background stamps.


“Watercolor Wonder” Designer Series Paper


The “Needlepoint Border” Embossing Folder are featured and brushed with Ink, from either of Island Indigo, Sahara Sand, and Soft Suede.
“Natural Composition Specialty” is sponged with Island Indigo or Soft Suede, then the “Scalloped Tag Topper” Punch is used at both ends. Add some gorgeous “Crochet Trim”, add a bow of either Bakers Twine or Twine, and add a safety pin from the Vintage Trinkets.


“Beau Château” Designer Series Paper, 
retired but available on the Clearance Rack


The Sentiment is then layered on top …
On “Naturals White”, the sentiment is from the “Geometrical” stamp set, and hand coloured using a combination of Old Olive, Island Indigo, and Early Espresso Stampin’ Markers. Using the “Chalk Talk” Framelits and Big Shot, cut out the sentiment, then add a cute little Antique Brad, and some Pearls to the “o”s, and then layer on Dimensionals.


“Tea For Two” Designer Series Paper, 
retired but available on the Clearance Rack


A line of cute ribbon in “Ruffle Stretch Trim” in Baked Brown Sugar, and on the retired Beau Chateau Album, I have used the retired “Pleated Satin” ribbon in Blushing Bride, is placed on the bottom edge of the Album{S}. The Cheerful Treat Album, has Strawberry Slushy Ruffle Stretch Trim.


“Cheerful Treat” Designer Series Paper, 
retired but available on the Clearance Rack


After using the Zutter to bind the Album, I have tied various ribbons in “Stretch Ruffle Trim”, “Chevron Ribbon” and “Stitched Grosgrain” to the coils.
To finish the project off, each Album has a matching Pen, with a piece of matching DSP Cardstock cut 4.5’x1/2” and is placed around the outside of the pen and inserted into the barrel.


Wah lah “Envelope Scrapbook Album” done!

"Envelope Punch Board"

“Watercolor Wonder” Designer Series Paper

“Beau Château” Designer Series Paper, 
retired but available on the Clearance Rack

“Cheerful Treat” Designer Series Paper, 
retired but available on the Clearance Rack

“Tea For Two” Designer Series Paper, 
retired but available on the Clearance Rack


“Geometrical” Stamp Set

 “En Francais” Background Stamp

“Hardwood” Background Stamp

Recipe Ingredient List
Stamp Sets: “En Francais”, “Geometrical” and “Hardwood”,
Ink: Island Indigo, Sahara Sand, Soft Suede, and Stampin’ Markers Island Indigo, Old Olive, and Early Espresso
Cardstock: Crumb Cake, Island Indigo, Naturals White, Natural Composition Specialty, “Watercolor Wonder”, and retired but available on the Clearance Rack “Beau Château”, “Tea For Two”, and “Cheerful Treat” DSP
Punches: “Corner”, Scallop Tag Topper”
Framelits/Dies: “Chalk Talk” Framelits
Xtras: Antique Brads, Bakers Twine, Dimensionals, Pearl Basic Jewels, Twine, Vintage Lace, Vintage Trinkets


Special Tools: Big Shot, Big Shot Magnetic Platform, Envelope Punch Board, Stampin’ Scrub and Stampin’ Cleaner, Stampin’ Trimmer and of course the “Zutter”!!!

Monday, 17 February 2014

“Card In A Box - Flowers”


After seeing numerous versions of the gorgeous “Card In A Box” card, I had to give it a go!
I found a really informative tutorial by Tina Weller aka "The Serene Stamper" on Pinterest. 
Tutorial by Tina Weller aka "The Serene Stamper"

Once assembled, the box is then designed to lay flat to allow for posting.

For the colour theme, I decided on two gorgeous colours Melon Mambo and Calypso Coral, with hints of buttery Daffodil Delight.


On Tina’s Tutorial, she used 2 strips across the middle of the box to adhere the flowers to, but I used 3 strips {or beams}.


Not to confuse you further … instead of using strips of cardstock to adhere the flowers to, I chose to use thick clear plastic, re-purposed from the packaging on ink cartridges.
As you can see from the undercarriage of the box, I adhered the plastic strips to the cardboard “beams”, once adhered; I then cut off the excess plastic.


The flowers are stamped from the “Flower Shop” stamp set, and layered between Dimensionals.
For the centre of the flowers, I stamped in Daffodil Delight a small stamp from the “Hello, Lovely” stamp set, onto Daffodil Delight cardstock, punched from the “Boho Blossom” Punch.

On the reverse side of the box, I stamped the words “You can never have too much happy” from the “Yippee-Skippee!” stamp set, with Melon Mambo and Calypso Coral Stampin’ Markers.
As the box can be folded flat, the back panel leaves room for a special message for the lucky recipient.


For the birds, I punched one complete bird from the “Bird Builder” punch, and then punched a second wing, that sat behind the bird, to make it look as though they were flying.


This card was a great way of using up scraps, as you can see from the list or papers I used!

I really enjoyed making my first “Card In A Box”, and am making another version tomorrow, so watch this space …

“Epic Day This and That” DSP
“Soho Subway” DSP
“Tea For Two” DSP, also available on My Digital Studio

“Flower Shop”

“Chalk Talk”
“Hello, Lovely”
Yippee-Skippee!”


 "Beautiful Wings" Embosslits

Recipe Ingredient List

Stamp Sets: “Chalk Talk”, “Flower Shop”, “Hello, Lovely”, “Yippee-Skippee!”
Ink:  Melon Mambo, Calypso Coral, and Daffodil Delight, with Melon Mambo and Calypso Coral Stampin’ Markers.
Cardstock: Naturals White, Old Olive, “Epic Day This and That” DSP, “Soho Subway” DSP, “Tea For Two” DSP, also available on My Digital Studio
Punches: Bird Builder, Boho Blossom, Corner, Pansy
Framelits/Dies: Beautiful Wings Embosslits, Chalk Talk Framelits,
Xtras: Black Rhinestones for the bird eyes, recycled plastic packaging, Stampin’ Dimensionals

Special Tools: Big Shot, Stampin’ Scrub and Stampin’ Cleaner, Stampin’ Trimmer
Related Posts Plugin for WordPress, Blogger...
Pin It
Blogger Wordpress Gadgets