Cotton Butterfly

Free background from VintageMadeForYou

Saturday 11 April 2015

Easter April 2015


Last weekend, here in New Zealand we celebrated Easter.
What with 2 kids in their “tweens” (11 years old and 13 years old}, Easter treats are getting harder and harder each year!
I always make a point of the Easter Bunny leaving something they can hang onto and re-use in years to come, such as mugs, lego tins etc.
This year I found a giant Bunny, measuring  20” long, and his ears are a giant 9” long!
 

Project 1 “Chick-House”


I made some cute little bird/chick-houses with my Sizzix Milk Carton Die, I stamped them with the “Hardwood” stamp in Sahara Sand. I chose Naturals White cardstock for the houses, and Tangerine Tango (cut using the “Large Scallop” Edgelits} for the roof, as this matched back perfectly with the tiny little chocolate carrots wrapped in carrot coloured foil.
I punched a little window with the 1” circle Punch, and added a Window Sheet/Acetate. That way you could see the little carrots inside the house!
The finishing touch is a little chick, punched with the Bird Builder punch, and the little wing is punched using the heart from the “Itty Bitty Accents Punch Pack”. Dazzling Details are added to the chicks wing, as the finishing touch.
Wah-lah … “Chick-House” done!

Project 1 ”Punch Art Easter Berry Basket”


I also made an Easter Basket with the “Berry Basket” Bigz L Die, with a cute little bow, made with the “Bow Builder” Punch.
Easter is the perfect time to get out your Punches, and experiment with some Punch Art. To get some other great Punch Art ideas, check out Pinterest
This is the Punch Art Easter Bunny Box that I made last year {featuring the Scalloped Tag Topper Punch},  that my Bunny is based on …


I used a variety of Punches to create the Easter Bunny: 1” Circle, 2” Circle, Boho Blossoms, Extra-Large Oval, heart from the Itty Bitty Accents Punch Pack, Large Oval, Owl Builder, Petite Petals, and “Circles Collection” Framelits.
The little bunny is holding a sign, stamped in Old Olive featuring the “Crazy About You” and “Perfect Pennants” stamp sets.
Wah-lah …”Punch Art Easter Berry Basket” done!


Thanks for taking the time to stop by, and if you would like to make a Stampin’ Up! purchase online, please head on over  to my Stampin’ Up! website.

Happy craftin’,
Kathe.


Recipe Ingredient List
Stamp Sets : “Crazy About You”, “Hardwood”, “Perfect Pennants”
Classic Stampin’ Ink Pads : Sahara Sand, Old Olive
Cardstock : Basic Black, Daffodil Delight, Naturals White, Pink Pirouette, Smokey Slate, Tangerine Tango, Whisper White
Framelits/Dies/Edgelits : “Berry Basket” Bigz L Die, “Circles Collection” Framelits, “Large Scallop” Edgelits, Sizzix “Milk Carton” Die
Punches : 1” Circle, 2” Circle, Bird Builder, Boho Blossoms, Bow Builder, Extra-Large Oval, heart from the Itty Bitty Accents Punch Pack, Large Oval, Owl Builder, Petite Petals
Xtras : Dazzling Details, Glue Dots, Seam Binding Ribbon in Pink Pirouette, Stampin’ Dimensionals, Uni-Ball Signo Gel Pen in White, Window Sheets/Acetate


Special Tools : Big Shot, Stampin’ Scrub and Stampin’ Cleaner, Stampin Trimmer, 

Thursday 9 April 2015

Week Deals Starts Wednesday 8th April 2015 ...


The Weekly Deals are up …
My pick is the “Circle Card Thinlits Die”, this is such a versatile Die, check out my other Posts regarding this gorgeous Dies here.
Happy shopping!


Thanks for taking the time to stop by, and if you would like to make a Stampin’ Up! purchase online, please head on over  to my Stampin’ Up! website.

Happy craftin’,

Kathe.


Wednesday 1 April 2015

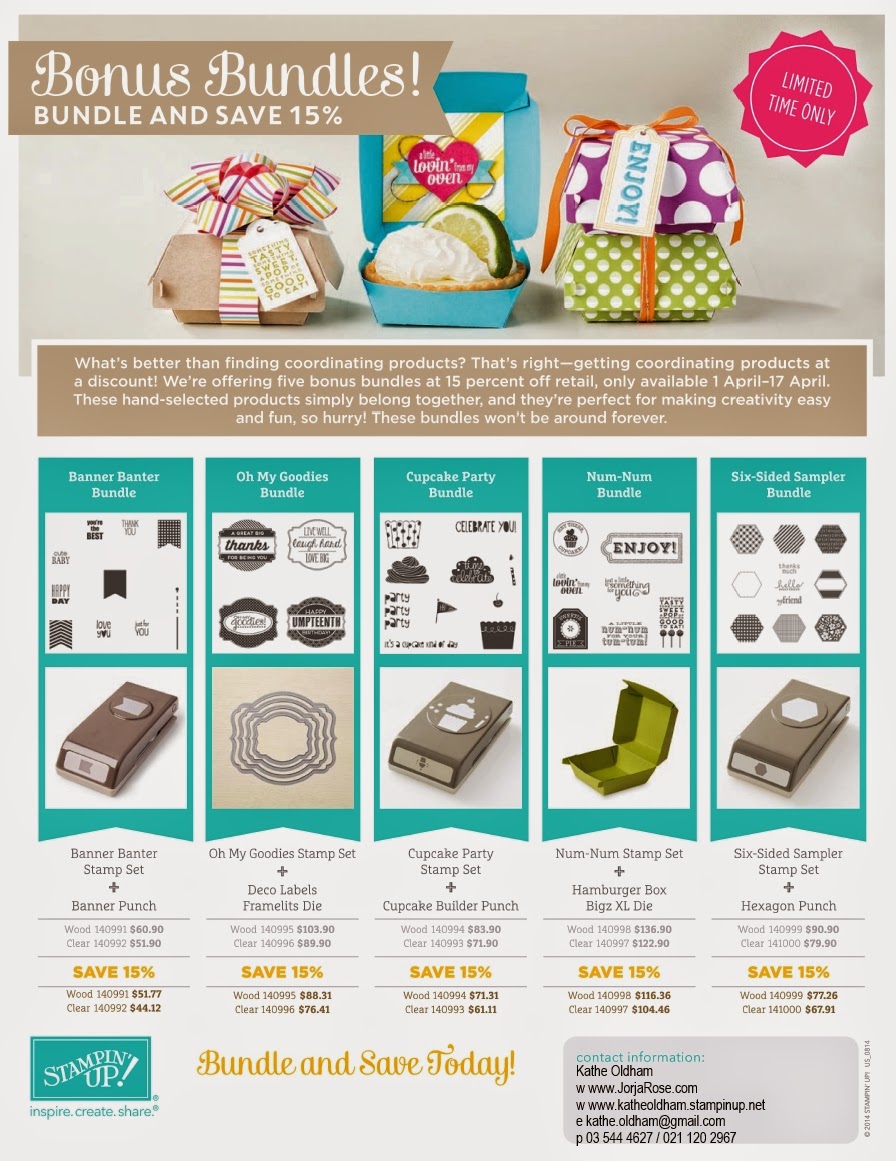
Bonus Bundles!, Bundle and Save 15%

What’s better than coordinating products? 
Getting coordinating products at a discount! 
From 1–17 April, Stampin' Up! are offering five bonus bundles at 15 percent off. 
Want to check out the bundles right now? 


Thanks for taking the time to stop by, and if you would like to make a Stampin’ Up! purchase online, please head on over  to my Stampin’ Up! website.

Happy craftin’,

Kathe.


Sunday 29 March 2015

“Create With Kathe” For Thursday 26th March 2015


This week we had Class on Tuesday 24th March 1pm>3pm, and on Thursday 26th March 1pm>3pm, and again 7pm>9pm.
We had 3 new ladies join us this week, and we had “such fun”!!!
AND … we do it all over again next week!


Our first project is a clean and elegant “Thank You Card with Emboss Resist”, featuring the “Lotus Blossom” stamp set, and the second project featured my new “Berry Basket” Die, and I took inspiration for the colours via my good friend Sally Rice ...

Project 1 “Thank You Card with Emboss Resist”


Techniques covered are Emboss Resist, Embossing, 3 Layer Stamping, Scoring with the "Simply Scored Scoring Tool", Die Cutting, Negative Detail, Punching {the ladies had a choice between the new “Ornate Tag Topper” Punch, the “Scalloped Tag Topper” Punch and the “Angled Tag Topper” Punch}, and layering with Dimensionals/Vellum, Cardstock.


Embellishments include the Pearl Basic Jewels, Rosette Trim from the Artisan Embellishment Kit, and Pink Pirouette Seam Binding Ribbon.
Stamp sets featured are “Painted Petals” and “Lotus Blossom”.


On the card insert, the “Lotus Blossom” is stamped in Melon Mambo, Blushing Bride, and Blushing Bride stamped off once.   Followed by Clear Stampin’ Embossing Powder.


I have also designed a Gift Card Holder, using the “Top Note” Die, which is cut twice in Whisper White cardstock, the smaller section is stamped with the “Lotus Blossom” stamp.
Wah-lah … “Thank You Card with Emboss Resist” done!


Project 2 “Easter/Thank You Berry Basket”


The card base for this is Sahara Sand, with the side panels of the basket having an overlay of sponged “Irresistibly Yours” Specialty Designer Series Paper, in Soft Sky.


The flowers are in Bermuda Bay, Coastal Cabana and Island Indigo, and are cut using the “Spiral Flower Originals” Die. Love this colour combo, which is inspired by Sally Rice.


The little bows are in Island Indigo cardstock, are we used the cute little “Bow Builder” Punch a bunch of these bows!


The leaves that surround the flowers are Garden Green cardstock and cut with the “Flower Frenzy” Die.


For the Tag, which is Naturals White cardstock, and has the word “Happy” cut in Island Indigo cardstock with the “Hello You” Thinlits. And the word “Easter” is from the “Crazy About You” stamp set, and stamped in Island Indigo ink.


For the second Tag, I have cut the word “Thanks” with the “Hello You” Thinlits, and the wording “for all that you do” is from the “For Being You” stamp set.
The finishing touches are the flowers, punched with the “Petite Petals” punch, and secured with a Candy Dot Brad Base, and a pearl added from the Pearl Basic Jewels.


The ribbon is Lost Lagoon, and matched back perfectly with this colour scheme.
Tune in next week, when we use the “Berry Basket” Die again, this time to make a “Flower Pot Card”.


Wha-lah … “Easter/Thank You Berry Basket” done!

Thanks for taking the time to stop by, and if you would like to make a Stampin’ Up! purchase online, please head on over  to my Stampin’ Up! website.

Happy craftin’,
Kathe.


Recipe Ingredient List
Stamp Sets : “Crazy About You”, “For Being You”, “Lotus Blossom” {SAB2015}, “Painted Petals”
Ink Pads : Bermuda Bay, Blushing Bride, Coastal Cabana, Island Indigo, Melon Mambo, Pear Pizzazz, Soft Sky,
Cardstock :  Garden Green, Naturals White, Sahara Sand, Soft Sky, Strawberry Slush, Whisper White, “Irresistibly Yours” Specialty Designer Series Paper, and Vellum
Framelits/Dies :Berry Basket“, “Butterflies”, “Flower Frenzy”, “Hello You”, “Spiral Flower Originals”, “Top Note”
Punches : Bow Builder, Hearts Border, Petite Petals, Project Life Corner, Scalloped Tag Topper,
Ribbon/Trim : Rosette Trim from the Artisan Embellishment Kit, Seam Binding Ribbon in Pink Pirouette, Lost Lagoon Ribbon   
Xtras : Candy Dot Brad Bases, Glue Dots, Pearl Basic Jewels, Stampin’ Dimensionals, Stampin’ Emboss Powder in Clear

Special Tools : Big Shot, Handheld Stapler, Heat Tool, Simply Scored Scoring Tool, Stampin’ Scrub and Stampin’ Cleaner, Stampin Trimmer,


Saturday 28 March 2015

Chameleon Pens: First Attempt ...


Yup …  I got my hands on the new Chameleon Pens!
Jen and I sat down for a “colour off” - which she won naturally as she is a star of colouring!
At the end of the day, the comment was “not bad”!
Not bad … absolutely amazing!!!


The colours were luminous, and I love that one pen can go from light to oh so dark, in a matter of seconds using the Mixing Chamber, and infusing with a colourless toning  medium, which is conveniently located at the end of each pen.


By varying the time from 5 seconds to 20 seconds, you can get a whole range of colour, and create depth and dimension.
For more info head on over to the Chameleon Pens website 


Well the countdown is on, because my Chameleon Pens are in the sky at the moment, and I am really looking forward to receiving my next BBB {Big Brown Box}, and to getting my Chameleon on!

Thanks for taking the time to stop by, and if you would like to make a Stampin’ Up! purchase online, please head on over  to my Stampin’ Up! website.

Happy craftin’,
Kathe.


Related Posts Plugin for WordPress, Blogger...
Pin It
Blogger Wordpress Gadgets