


Reilly
had a birthday party to go today, and being 12 {well he’s actually 12 going on
14 on Tuesday!!!}, the card needed to be “cool”, hence the Alligator from the Sale-A-Bration
stamp set “See Ya Later” and the croc from the “Zoo Babies” stamp set seemed
perfect.
My
new stamp “Hardwood” has just arrived and I have used it in two projects today,
I think it has now become my favourite!
Stamped
in “Crumb Cake” on the front of the card, it gave a neat background to the snappy
alligator!
I
have seen many crafters replicate the alligator using the Petite Pennants
Builder punch, so I can not give credit back to the original artist – sorry.
Punched
in my favourite colour Old Olive, I also used the Old Olive to stamp the croc from
the “Zoo Babies” stamp set, and the words “Yippee-Skippee” from you guessed it …
the “Yippee-Skippee!” stamp set!
Now
back to the croc, I gave it some googly eyes and gnashing teeth (in Whisper
White) to make it seem more scary!
The
birthday wishes are also from the Sale-A-Bration stamp set “See Ya Later”, and
the Stampin’ Makers used are Old Olive, Tangerine Tango and Real Red.
Stamped
on to Naturals White, and cut using the Chalk Talk Framelits, layered and
adhered to Old Olive cardstock, and then dimensional’d.
A
Candy Dot in Old Olive completes the card and anchors the corner.

On
the inside of the card, and cut from Old Olive, I have used my favourite “Top
Note” Bigz Die to make a pocket for the gift voucher, and added a Pin Wheel for
added fun!

Also
on the inside of the card and stamped in Crumb Cake is the “Gorgeous Grunge”
stamp set.

So
{hopefully} this card is totally grunge and way cool dude!!!


Polka Dot Parade Designer Series Paper $22.95

"See Ya Later" {SAB}
Choose a
Sale-A-Bration reward for FREE with a $110+ order

":Zoo Babies"

"Hardwood"

"Gorgeous Grunge"
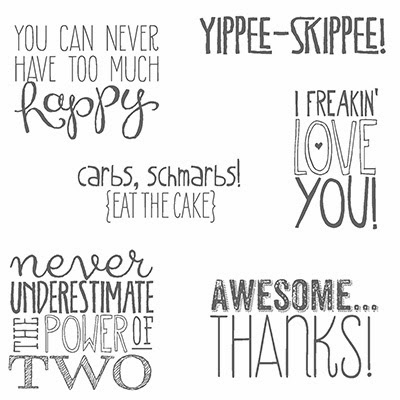
"Yippee-Skippee!"

"Petite Pennants Builder" Punch

"Owl Builder" Punch

"Top Note" Bigz Die

"Beautiful Wings" Embosslits
Recipe Ingredient List
Stamp Sets: Gorgeous Grunge, Hardwood, See Ya Later {SAB}, Yippee-Skippee! and
Zoo Babies
Ink: Crumb Cake and Old Olive, with Stampin’ Makers Old Olive,
Tangerine Tango and Real Red
Cardstock: Naturals
White, Old Olive, Polka Dot Parade DSP, Whisper White
Punches: Owl Builder, Petite Pennants Builder
Framelits/Dies: Beautiful
Wings Embosslits, Chalk
Talk Framelits, Top Note Bigz Die
Xtras:
Brad, Candy Dot, Googly Eyes, Stampin’ Dimensionals
Special Tools: Big Shot,
Stampin’ Scrub and Stampin’ Cleaner, Stampin’
Trimmer


