Cotton Butterfly

Free background from VintageMadeForYou

Tuesday 30 September 2014

Cupcake Party …

Sunday we celebrated my nieces’ 3rd birthday.
She had a fancy dress them, and I went as a Policewoman, and won best dressed {and a pack of Smarties - similar to M&Ms}!
Wayne of course, went as a rugby player from his favourite Club, Waimea Old Boys Rugby Football Club Inc.


Seems just yesterday that we were celebrating her 2nd birthday, and this is last years card ...


This year I went with a Cupcake theme for her birthday card, which featured the “Cupcake Party”, “Hardwood” and ”Remembering Your Birthday” stamp sets.


Fab decision as her birthday card, as her birthday cake was a "Cupcake" Birthday Cake!


Thanks for taking the time to stop by, and if you would like to make a Stampin’ Up! purchase online, please head on over  to my Stampin’ Up! website.

Happy craftin’,
Kathe.

"Cupcake Party” Stamp Set, matches back with the "Cupcake Builder" Punch


“Hardwood” Background Stamp


”Remembering Your Birthday” Stamp Set


Recipe Ingredient List
Stamp Sets : "Cupcake Party”, “Hardwood” and ”Remembering Your Birthday”
Ink : Sahara Sand, Early Espresso, Strawberry Slush, Versamark
Stampin’ Write Markers : Early Espresso, Strawberry Slush
Cardstock :  Crumb Cake, Glimmer Paper in Dazzling Diamonds, Strawberry Slush, Whisper White
Punches : 2 1/2” Circle, Cupcake Builder, Hearts Border, Heart from the Itty Bitty Accents Punch Pack, Project Life Corner
Ribbons : Bakers Twine in White
Xtras : 2 Way Glue Pen, Dimensionals, White Stampin’ Chalk Marker, Stampin’ Emboss Powder in White, Stampin’ Glitter in Dazzling Diamonds

Special Tools : Heat Tool, Paper Crimper {non-Stampin’ Up!}, Stampin’ Scrub and Stampin’ Cleaner, Stampin Trimmer,


#CreateWithKathe #JorjaRoseFiles

Happy New Home …

Happy New Home …

My bestie just moved into her new home over the weekend, and this is the card I made for her …
The stamp set "Holiday Home" is just perfect for this card ...


Thanks for taking the time to stop by, and if you would like to make a Stampin’ Up! purchase online, please head on over  to my Stampin’ Up! website.

Happy craftin’,
Kathe.

“Endless Wishes” Stamp Set


“Hardwood” Background Stamp


“Holiday Home” Stamp Set

Recipe Ingredient List
Stamp Sets : “Endless Wishes”, “Hardwood”, “Holiday Home”
Ink : Baked Brown Sugar, Early Espresso, Pool Party
Stampin’ Write Markers : Real Red
Cardstock :  Crumb Cake, Naturals White
Punches : 2 1/2” Circle, Hearts Border, Heart from the Itty Bitty Accents Punch Pack
Ribbons : Bakers Twine in White
Xtras : Aqua Painters, Dimensionals, White Stampin’ Chalk Marker

Other : Red Glimmer Paper

Special Tools : Stampin’ Scrub and Stampin’ Cleaner, Stampin Trimmer,

#CreateWithKathe #JorjaRoseFiles


Monday 29 September 2014

“Create With Kathe” For Thursday 25th September 2014


This weeks “Create With Kathe“ Craft Class was all about shades of Gray, along with utilizing products from the Weekly Deals.
Our first project featured the “On Film” Framelits, and a gorgeous bird that has been heat embossed in Silver, with a feather from the “Four Feathers” stamp set, then punched using the Bird Builder Punch, love this effect!
The second project was a fancy fold Z card, featuring the “Window Frames Collection” Framelits, along with the “Bloom With Hope” stamp set.
This layout/sketch is a case via Stephanie David, entitled “For The Birds”.

Project 1 Shades Of Gray Card


The card base for this card is Smokey Slate, which as been embossed with the “Honeycomb” Textured Embossing Folder, and the corners rounded with the Project Life Corner Punch.
The sentiment “Thinking Of You” is from the “Everyday Occasions Card Making Kit” and had been heat embossed in Silver on Vellum, then backed with Basic Gray cardstock, and cut with the “Project Life Cards & Labels” Framelits. Two small Mini Brads secure the Vellum to the Basic Gray cardstock, which is then adhered to the card with Dimensionals.
For the film strip, Basic Black cardstock is cut wit the “On Film” Framelits, it is then backed with Whisper White cardstock to give a dramatic effect.
Basic Gray cardstock has been heat embossed in Silver, with a feather from the “Four Feathers” stamp set, then punched using the Bird Builder Punch, love this effect!
A paper Doily is placed behind the film strip, and a small Heart added, featuring the Dazzling Diamonds Glimmer Paper, which is punched using the “Itty Bitty Accents Punch Pack”.
The finished film strip is then adhered with Dimesnionals.
Some White Bakers Twine is tied around the card and looped through a Basic Metal Button, and tied with a bow.


For the inside of the card, I kept ii simple with a Heart in Dazzling Diamonds Glimmer Paper in the upper right hand corner, and along the base of the card, heat embossed in Silver is the cute flower border from the Photopolymer  stamp set "Bordering Blooms" + the corners are rounded with the Project Life Corner punch.
Wah-lah … Shades Of Gray Card done!

Project 2 “Window Frames” Z Fold Card


This card was a quick and easy project, as it is all about layering.
Whisper White cardstock is folded in half, then folded back to form a Z fold.
Smokey Slate cardstock is layered with Designer Series Paper "All Is Calm", which gives a nice subtle effect.
Three Pearl Basic Jewels have been coloured with the Daffodil Delight Blendabilities and added to the top left hand corner, which has also been repeated on the bottom right hand corner of the larger panel.
For the Window, there are three layers, first in Smokey Slate, which has been pieced using the “Festive Paper Piecing” guide, and the Paper-Piercing Tool and the Stampin’ Pierce Mat.


The second layer in Whisper White is plain {no embellishments}.
The third layer, also in Whisper White, is stamped with the “Bloom With Hope” stamp set in Black StazOn, then coloured with the Aqua Painters in Daffodil Delight, Melon Mambo, Strawberry Slush and a small coloured Pearl Basic Jewel is added to the centre of each flower. The stems have been coloured using the Old Olive Stampin’ Write Marker.
The Window Panel is then adhered with tape/glue on one side of the Z fold, to overlap onto the insert part of the card.
For the card insert, layer Smokey Slate with Whisper White cardstock.
Add the sentiment “Happy Birthday” or “With Sympathy” also from the “Bloom With Hope” stamp set.


The final touch are three little Pearl Basic Jewels, which have been coloured with the Daffodil Delight Blendabilities, and added to the right hand corner of the card insert, which anchors the projects, and finishes the card of nicely.
Wah-lah … Window Frames” Z Fold Card done!

Thanks for taking the time to stop by, and if you would like to make a Stampin' Up! purchase online, please head on over to my Stampin’ Up! website.

Happy craftin’,
Kathe.

“Bloom with Hope” Stamp Set


"Bordering Blooms" Photopolymer Stamp Set


“Four Feathers” Stamp Set


“On Film” Framelits


“Project Life Cards & Labels” Framelits


“Window Frames Collection” Framelits

Recipe Ingredient List
Stamp Sets : “Bloom with Hope”, "Bordering Blooms", stamp from the “Everyday Occasions Card Making Kit”, “Four Feathers”
 Ink : Black StazOn, Daffodil Delight, Melon Mambo, Strawberry Slush, Versamark
Stampin’ Write Markers : Old Olive
Blendabilities : Daffodil Delight
Cardstock :  Basic Black, Basic Gray, Designer Series Paper "All Is Calm", Glimmer Paper in “Dazzling Diamonds”, Smokey Slate, Vellum, Whisper White,
Punches : Bird Builder, “Itty Bitty Accents Punch Pack”, Project Life Corner
Textured Impressions Embossing Folder : Honeycomb
Framelits/Dies/Thinlits : “On Film” Framelits, “Project Life Cards & Labels” Framelits, “Window Frames Collection” Framelits
Ribbons : Bakers Twine in White
Xtras : Aqua Painters, Basic Metal Button, Dimensionals, Doilys, “Festive Paper Piecing” guide, Mini Brads, Paper-Piercing Tool, Silver Stampin’ Emboss Powder , Pearl Basic Jewels, Stampin’ Pierce Mat

Special Tools : Big Shot, Heat Tool, Magnetic Platform, Stampin’ Scrub and Stampin’ Cleaner, Stampin Trimmer, StazOn Cleaner

#CreateWithKathe #JorjaRoseFiles

Wednesday 24 September 2014

Weekly Deals: For September 24th 2014


The “Weekly Deals” are up!


They all look so good, ‘tis such a shame that I already own the “Circles Collection” Framelits, the “Window Frames Collection” Framelits and the “On Film” Framelits, + the Essentials, Eclectic and Occasional Paper Piercing Packs!
Mmmmmm my mind in now swirling with projects to make with the yummy Stampin’ Up! products!

You’ll just have to wait and see what we create at tomorrows “Create With Kathe” Classes!
To purchase online, please go to my Stampin’ Up!website.

Happy craftin’
Kathe.


#CreateWithKathe #JorjaRoseFiles

“Create With Kathe” For Thursday 18th September 2014


#CreateWithKathe #JorjaRoseFiles

Thursday’s “Create with Kathe” Class, we had 2 new ladies attend the evening Class.
As per Bev’s request … we learnt all about “Hexagons”!
I love to share how the Stampin’ Up! products are so versatile, and match back with each other, and the Hexagon family of products are an awesome example ….
There is the “Six-Sided Sampler” stamp set and matching Hexagon Punch, the “Honeycomb” Textured Impressions Embossing Folder and the “Hexagon Hive” Thinlits.
Our first project featured the “Oh My Goodies” and “Perfect Pennant” stamp sets + of course heaps of hexagons …
The second project is a case that has been altered, originally made as a Christmas card by Jacque Williams from Stamp Happy, but altered to be a “Floral Patch” birthday card, and features the “Endless Wishes”, “Hardwood”, and “Flower Patch” stamp sets …

Project 1 Hexagons Gone Mad


The card base for this card is Lost Lagoon, which is overlayed with Whisper White cardstock, that has been embossed with the “Honeycomb” Textured Impressions Embossing Folder.
The gorgeous “All Abloom” Designer Series Paper Stack has been cut into tiny hexagons, using the “Hexagon Hive” Thinlits – makes life so much easier when these products interchange with each other!
Each card has 3 hexagons which are extra special, as they are from the gorgeous Glimmer Paper, and are in “Dazzling Diamonds”, on the inside of the card, there is also a heart punched with the “Itty Bitty Accents Punch Pack”.
For the Pennant/Banner, White Stampin’ Emboss Powder has been used on Vellum, with the words “Life Doesn’t Have To Be Perfect To Be Wonderful” is from the “Perfect Pennants” stamp set.
The Vellum is laid over Lost Lagoon cardstock and cut using the “Banners” Framelits.
A scrap of Venetian Crochet Trim runs down the length of the Pennant/Banner.
A Very Vintage Designer Buttons is threaded with Linen Thread, and tied with a bow, and placed on the Pennant/Banner.


On the inside of the card, the words “Live Well laugh hard Love Big” {yes the words are in lower and upper case!} are from the “Oh My Goodies” stamp set and are coloured using the Stampin’ Write Markers in Daffodil Delight, Lost Lagoon and Strawberry Slush , and stamped on Whisper White cardstock.
The “Hearts Border” Punch gives negative detail, as the Lost Lagoon cardstock shows through the punched hearts.
A perfect little heart punched from the “Dazzling Diamonds” Glimmer Paper on the bottom right hand corner finished the project nicely
Wah-lah …”Hexagons Gone Mad” card done!

Project 2 Flower Patch case


This second project is a case that has been altered, originally made as a Christmas card by Jacque Williams from Stamp Happy, but altered to be a “Floral Patch” birthday card, and features the “Endless Wishes”, “Hardwood”, and “Flower Patch” stamp sets …
The card base is Crumb Cake, first cut a circle with the “Circles Collection” Framelits, or with a 2 ½” Punch.
Then with the “Hardwood” Background stamp, stamp in Sahara Sand, so that the Hardwood stamp runs half way through the circle.
Stamp along the edge of the “Hardwood” image, in Calypso Coral the word “Greetings” from the “Endless Wishes” stamp set.
Tie Bakers Twine in White, around the edge of the card, threading back into the circle, in three strands, on the lower portion of the card tie a bow, on the upper portion of the card tie a neat and tidy reef knot at the back.
As an anchor, add a Rhinestone Basic Jewel that has been coloured with the Calypso Coral Blendabilities Pens in the darker of the 3 shades, on the bottom right hand corner of the card {to anchor the project}.


For the card insert, line up the Whisper White cardstock {but don’t adhere yet}, through the Circle {or window}, stamp and layer flowers from the “Flower Patch” stamp set in Crisp Cantaloupe and Calypso Coral.
Below the flower, stamp the words “Happy Blooming Birthday” in Calypso Coral, ensuring that the words are not seen through the Circle {or window}.
Add a small heart in Calypso Coral, punched using the “Itty Bitty Accents Punch Pack” to the b0ottom right hand corner of the Insert.
NOW you ca adhere the Insert to the Base!
Wah-lah … “Flower Patch case” done!

To purchase any of these Stampin’ Up! goodies, please go to my Stampin' Up! website.

Happy craftin’,
Kathe.


 “Endless Wishes” Stamp Set


“Flower Patch” Stamp Set


“Hardwood” Background Stamp


“Oh My Goodies” Stamp Set


“Perfect Pennants” Stamp Set

Recipe Ingredient List
Stamp Sets : “Endless Wishes”, “Flower Patch”, “Hardwood”, “Oh My Goodies”, “Perfect Pennants”
 Ink : Calypso Coral, Crisp Cantaloupe, Crumb Cake, Sahara Sand, Versamark
Stampin’ Write Markers : Daffodil Delight, Lost Lagoon and Strawberry Slush
Blendabilities : Calypso Coral
Cardstock : “All Abloom” Designer Series Paper Stack, Crumb Cake Glimmer Paper in “Dazzling Diamonds”, Lost Lagoon, Vellum, Whisper White,
Punches : “2 ½” Circle”, “Itty Bitty Accents Punch Pack”, “Hearts Border”
Textured Impressions Embossing Folder : Honeycomb
Framelits/Dies/Thinlits : “Banners” Framelits, “Circles Collection” Framelits “Hexagon Hive” Thinlits
Ribbons : Bakers Twine in White, Linen Thread, Venetian Crochet Trim
Xtras : Dimensionals, White Stampin’ Emboss Powder , Rhinestone Basic Jewel, Very Vintage Designer Buttons,

Special Tools : Big Shot, Heat Tool, Magnetic Platform, Stampin’ Scrub and Stampin’ Cleaner, Stampin Trimmer

#CreateWithKathe #JorjaRoseFiles


Tuesday 23 September 2014

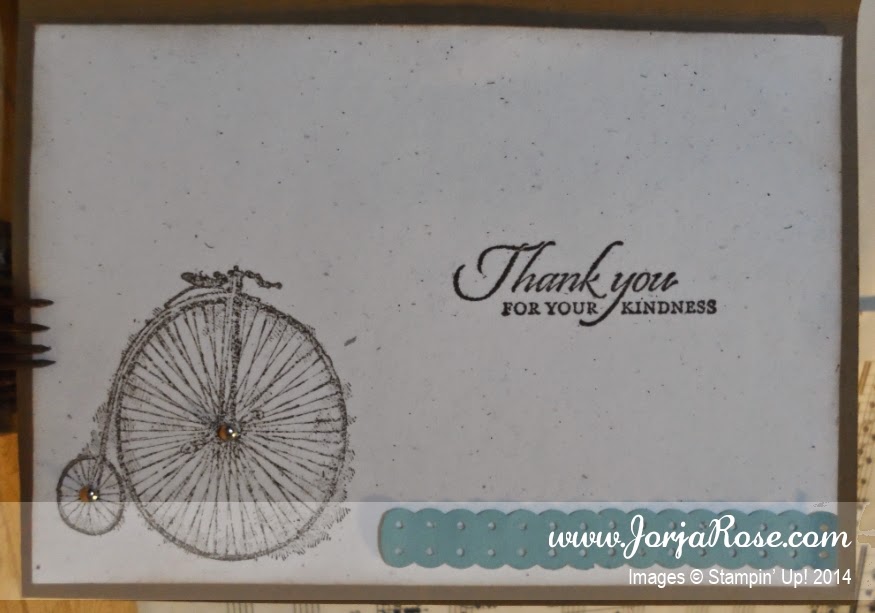
Thank You Card By Reilly {and Moi!} ...

We have some lovely neighbours, that had a surplus-to-requirements bike, and they kindly thought of our son Reilly.
Reilly is now whizzing around the neighbourhood on his new bike, and is even leaving for school on time!
This is a wee “Thank-You” card that Reilly and I made.
For this first time he used my Big Shot “Betsy The Beast”, I also have an second Big Shot that we use in Class, called “JorjaRose”!
What with a Bicycle being involved in this very generous gift, I chose to centre the card around a Penny Farthing, with a vintage shabby chic theme.
I tried a new idea out on this card, I placed the Antique Brad through the Very Vintage Designer Button, and I love how it turned how out.


To purchase any of these Stampin’ Up! goodies, please go to my Stampin' Up! website 

Happy craftin',
Kathe.


{Vintage} "Feeling Sentimental” Stamp Set


“Yippee-Skippee!” Stamp Set


“Wetlands” Stamp Set

Recipe Ingredient List
Stamp Sets : {Vintage} "Feeling Sentimental”, “Yippee-Skippee!”, “Wetlands”
Ink : Crumb Cake, Early Espresso
Stampin’ Write Markers : Early Espresso, Lost Lagoon
Cardstock : Lost Lagoon, Naturals White, Soft Suede
Punches : Dotted Scallop Ribbon Border
Embossing Folders : Large Polka Dots
Framelits/Dies/Thinlits : “Chalk Talk”
Ribbons : Seam Binding Ribbon in Crumb Cake, Silky Taffeta Ribbon in Lost Lagoon, Venetian Crochet Trim
Xtras : Antique Brads, Dimensionals, Mini Brads, Mini Safety Pin, Very Vintage Designer Buttons,

Special Tools : Big Shot, Magnetic Platform, Stampin’ Scrub and Stampin’ Cleaner, Stampin Trimmer


#CreateWithKathe #JorjaRoseFiles
Related Posts Plugin for WordPress, Blogger...
Pin It
Blogger Wordpress Gadgets