Cotton Butterfly

Free background from VintageMadeForYou
Showing posts with label Bloom With Hope. Show all posts

Saturday 28 March 2015

Chameleon Pens: First Attempt ...


Yup …  I got my hands on the new Chameleon Pens!
Jen and I sat down for a “colour off” - which she won naturally as she is a star of colouring!
At the end of the day, the comment was “not bad”!
Not bad … absolutely amazing!!!


The colours were luminous, and I love that one pen can go from light to oh so dark, in a matter of seconds using the Mixing Chamber, and infusing with a colourless toning  medium, which is conveniently located at the end of each pen.


By varying the time from 5 seconds to 20 seconds, you can get a whole range of colour, and create depth and dimension.
For more info head on over to the Chameleon Pens website 


Well the countdown is on, because my Chameleon Pens are in the sky at the moment, and I am really looking forward to receiving my next BBB {Big Brown Box}, and to getting my Chameleon on!

Thanks for taking the time to stop by, and if you would like to make a Stampin’ Up! purchase online, please head on over  to my Stampin’ Up! website.

Happy craftin’,
Kathe.


Monday 29 September 2014

“Create With Kathe” For Thursday 25th September 2014


This weeks “Create With Kathe“ Craft Class was all about shades of Gray, along with utilizing products from the Weekly Deals.
Our first project featured the “On Film” Framelits, and a gorgeous bird that has been heat embossed in Silver, with a feather from the “Four Feathers” stamp set, then punched using the Bird Builder Punch, love this effect!
The second project was a fancy fold Z card, featuring the “Window Frames Collection” Framelits, along with the “Bloom With Hope” stamp set.
This layout/sketch is a case via Stephanie David, entitled “For The Birds”.

Project 1 Shades Of Gray Card


The card base for this card is Smokey Slate, which as been embossed with the “Honeycomb” Textured Embossing Folder, and the corners rounded with the Project Life Corner Punch.
The sentiment “Thinking Of You” is from the “Everyday Occasions Card Making Kit” and had been heat embossed in Silver on Vellum, then backed with Basic Gray cardstock, and cut with the “Project Life Cards & Labels” Framelits. Two small Mini Brads secure the Vellum to the Basic Gray cardstock, which is then adhered to the card with Dimensionals.
For the film strip, Basic Black cardstock is cut wit the “On Film” Framelits, it is then backed with Whisper White cardstock to give a dramatic effect.
Basic Gray cardstock has been heat embossed in Silver, with a feather from the “Four Feathers” stamp set, then punched using the Bird Builder Punch, love this effect!
A paper Doily is placed behind the film strip, and a small Heart added, featuring the Dazzling Diamonds Glimmer Paper, which is punched using the “Itty Bitty Accents Punch Pack”.
The finished film strip is then adhered with Dimesnionals.
Some White Bakers Twine is tied around the card and looped through a Basic Metal Button, and tied with a bow.


For the inside of the card, I kept ii simple with a Heart in Dazzling Diamonds Glimmer Paper in the upper right hand corner, and along the base of the card, heat embossed in Silver is the cute flower border from the Photopolymer  stamp set "Bordering Blooms" + the corners are rounded with the Project Life Corner punch.
Wah-lah … Shades Of Gray Card done!

Project 2 “Window Frames” Z Fold Card


This card was a quick and easy project, as it is all about layering.
Whisper White cardstock is folded in half, then folded back to form a Z fold.
Smokey Slate cardstock is layered with Designer Series Paper "All Is Calm", which gives a nice subtle effect.
Three Pearl Basic Jewels have been coloured with the Daffodil Delight Blendabilities and added to the top left hand corner, which has also been repeated on the bottom right hand corner of the larger panel.
For the Window, there are three layers, first in Smokey Slate, which has been pieced using the “Festive Paper Piecing” guide, and the Paper-Piercing Tool and the Stampin’ Pierce Mat.


The second layer in Whisper White is plain {no embellishments}.
The third layer, also in Whisper White, is stamped with the “Bloom With Hope” stamp set in Black StazOn, then coloured with the Aqua Painters in Daffodil Delight, Melon Mambo, Strawberry Slush and a small coloured Pearl Basic Jewel is added to the centre of each flower. The stems have been coloured using the Old Olive Stampin’ Write Marker.
The Window Panel is then adhered with tape/glue on one side of the Z fold, to overlap onto the insert part of the card.
For the card insert, layer Smokey Slate with Whisper White cardstock.
Add the sentiment “Happy Birthday” or “With Sympathy” also from the “Bloom With Hope” stamp set.


The final touch are three little Pearl Basic Jewels, which have been coloured with the Daffodil Delight Blendabilities, and added to the right hand corner of the card insert, which anchors the projects, and finishes the card of nicely.
Wah-lah … Window Frames” Z Fold Card done!

Thanks for taking the time to stop by, and if you would like to make a Stampin' Up! purchase online, please head on over to my Stampin’ Up! website.

Happy craftin’,
Kathe.

“Bloom with Hope” Stamp Set


"Bordering Blooms" Photopolymer Stamp Set


“Four Feathers” Stamp Set


“On Film” Framelits


“Project Life Cards & Labels” Framelits


“Window Frames Collection” Framelits

Recipe Ingredient List
Stamp Sets : “Bloom with Hope”, "Bordering Blooms", stamp from the “Everyday Occasions Card Making Kit”, “Four Feathers”
 Ink : Black StazOn, Daffodil Delight, Melon Mambo, Strawberry Slush, Versamark
Stampin’ Write Markers : Old Olive
Blendabilities : Daffodil Delight
Cardstock :  Basic Black, Basic Gray, Designer Series Paper "All Is Calm", Glimmer Paper in “Dazzling Diamonds”, Smokey Slate, Vellum, Whisper White,
Punches : Bird Builder, “Itty Bitty Accents Punch Pack”, Project Life Corner
Textured Impressions Embossing Folder : Honeycomb
Framelits/Dies/Thinlits : “On Film” Framelits, “Project Life Cards & Labels” Framelits, “Window Frames Collection” Framelits
Ribbons : Bakers Twine in White
Xtras : Aqua Painters, Basic Metal Button, Dimensionals, Doilys, “Festive Paper Piecing” guide, Mini Brads, Paper-Piercing Tool, Silver Stampin’ Emboss Powder , Pearl Basic Jewels, Stampin’ Pierce Mat

Special Tools : Big Shot, Heat Tool, Magnetic Platform, Stampin’ Scrub and Stampin’ Cleaner, Stampin Trimmer, StazOn Cleaner

#CreateWithKathe #JorjaRoseFiles

Friday 29 August 2014

“Create With Kathe” For Thursday 21st August 2014


This past week was all about the gorgeous and versatile “Kinda Eclectic” stamp set, and the Scallop Tag Topper Punch.
We made two projects, the first a Gift Holder, which contains a small greeting card and cellophaned Lip Balm, the second project is a Greeting Card with a fancy closing {made wit the Scallop Tag Topper Punch}, and has many details ...
The ladies got to choose between two of the new “In Colours”, Blackberry Bliss or Lost Lagoon …


Project 1 Gift Holder + Git Card + Lip Balm
This is a case via my good friend Ruth, however I altered the measurements and added the Scallop Tag Topper closing + Lip Balm Holder, and card.
Naturals White cardstock forms the base of the Gift Holder.
Please see diagram …


Cut cardstock 7” x 11 1/2”
Along the 7” length, score at 2 ½” in on both sides, which leaves a 2” panel in the middle.
Along the 11 ½” length, score at 4 ¾” and 6 ¾”
At the 4 ¾” and 6 ¾” score marks, measure 2 ½ “ along the crease line, draw a diagonal line to the fold, cut of all shaded areas.
Once the shaded areas are cut away, measure ½” along the 11 ½ “ length and cut the sides off.
You will be left with a long slim piece of cardstock with what looks like wings on either side.
Crease along the scored lines.
Stamp on one side, at both ends, where the Scallop Tag Topper will be punched.


Flip the cardstock over and stamp the Wings.


First stamp the leaves with the “Kinda Eclectic” stamp set in Crumb Cake, once dry, stamp over and just to the side {to give a shadow effect} with either Blackberry Bliss or Lost Lagoon.
Fold the Wings inwards, and turn the cardstock inside out, the “Wings” then become the pockets, in which the gift card is placed.


A cute little card slips into the pocket, with some butterflies added for special effect.
Hanging in the middle of the Tag Tops is a cellophane bag which contains a Lip Balm.


Ribbon is threaded through the Tag Tops and tied.
Wah-lah … Gift Holder + Git Card + Lip Balm done!

Project 2 Scallop Tag Topper Greeting Card


The cardbase is Naturals White, and has accents of Blackberry Bliss or Lost Lagoon. Designer Series Paper Stack in the corresponding colour is also used.
Stamp sets featured are “Bloom with Hope”, “Four Feathers”, “Hardwood”, and “Six-Sided Sampler”.

This card features many xtra details like the two toned feather, white embossed feathers, negative detail via the Hearts Border Punch, Vintage Faceted Designer Buttons that have been coloured with the Blendabilities, Crystals Effects Dots that have been coloured with the Blendabilities, and Aqua Painted flowers.
Wah-lah … Scallop Tag Topper Greeting Card done!


Phew!!! 
This Class should have been 2 hours, but it actually took 3 hours, but all the effort was worth it!


Recipe Ingredient List
Stamp Sets: “Bloom with Hope”, “For All Things”, “Four Feathers”, “Hardwood”, “Kinda Eclectic”, and “Six-Sided Sampler”.
Ink:  Blackberry Bliss, Crumb Cake, Lost Lagoon, Sahara Sand, Black StazOn
Blendabilities: Coastal Cabana, Rich Razzleberry
Cardstock:  Blackberry Bliss, Lost Lagoon, Naturals White, Whisper White, Designers Series Paper Stack in Blackberry Bliss and Lost Lagoon + Vellum
Punches: Bitty Butterfly, Corner, Elegant Butterfly, Hearts Border, Hexagon, Scallop Tag Topper,
Framelits/Dies: Four Feathers, Hexagon Hive
Xtras: Cellophane Bags, Crystal Effects, Dimensionals, Embossing Powder in White, Linen Thread, Rhinestone Basic Jewels, Stitched Satin Ribbon, Tombow Multipurpose Glue, Venetian Crochet Trim,  Vintage Faceted Designer Buttons, oh and a Lip Balm!

Special Tools: Big Shot, Heat Tool, Magnetic Platform, Stampin’ Scrub and Stampin’ Cleaner, Stampin’ Trimmer, StazOn Cleaner


Thursday 10 July 2014

New Catty Wish List

OMG … so I just placed my first order from the new Catty, and am dying with anticipation!!!

In my preorder, I was able to order the "Bloom With Hope", "In This Together" and "Something To Say" stamps sets, which I really love using, and even featured in todays Class {I will be posting photos later of today's class}.


"Bloom With Hope" Stamp Set


 "In This Together" Stamp Set


"Something To Say" Stamps Set

I created my “Wish List”, then changed it up a tad,  the stamp sets that made the first cut and were ordered are "Banner Banter", "Beautiful Bunch”,  "Cupcake Party", "Flower Patch", "Flowering Flourishes", "Groovy Love", "Kinda Eclectic”, “Pictogram Punches”,  "Point & Click", “Something For Baby”, AND "World Of Dreams"!!!


"Banner Banter" Stamp Set


"Beautiful Bunch” Stamp Set


"Cupcake Party" Stamp Set


"Flower Patch" Stamp Set


"Flowering Flourishes" Stamp Set


"Groovy Love" Stamp Set


"Kinda Eclectic” Stamp Set


“Pictogram Punches” Stamp Set


"Point & Click" Stamp Set


“Something For Baby” Stamp Set


"World Of Dreams" Stamp Set

Which stamp set am I most excited about? …  "Kinda Eclectic”, I have so many ideas for using this gorgeous stamp set, my other fav looks to be "World Of Dreams", love the look of silhouettes!

AND Punches that made the cut …. 7/8" Scallop Circle, Dotted Scallop Ribbon Border, Fun Flower, Sweetheart {which looks to be my new fav}, and What's Up.

+ there were the Dies/Framelits that I just had to order … Baby's First, Flower Fair, Flower Frenzy, Hamburger Box, Little Letters Thinlits, Perfect Print Alphabet, and of course the "Stars" Framelits!

Well the count down is on, and I and I hope to receive my Stampin’ Up! box of goodies on Tuesday … can’t wait!


Gotta say, love being a Stampin’ Up! Demonstrator with all the perks of the Hostess Rewards!


Monday 16 June 2014

“Create With Kathe” For Thursday 12th June 2014


WOWsers we had fun on Thursday!
Both Classes were small, but we had maaaaaany laughs!


Bev made Pikelets and homemade Kiwifruit Jam for our afternoon tea, she is such a sweetie, and she also made a jar of Kiwifruit Jam for Jen, Kay and Marion, and oh Moi! AND it is divine – thanks Bev!
At the evening class we had a newbie, Audrey attend, and we finished not too late {compared with previous nights hint hint Bev and Jen!!!}, although we did eat most of the Chewy Caramel Tim Tams!
Our first project was inspired by a Scrapbook Layout by Jacque Williams, which she taught the previous weekend at our quarterly Scrapbook Class.
The second project, the ladies made 4 cards each, and got to mix and match their choice of colours, Hostess stamp sets {“Simply Sketched” and “Bloom With Hope”}, and techniques: Aqua Painters, Blendabilities and Blender Pens.
I was so impressed with their gorgeous work, that all the ladies artful work is featured below ..

By Audrey ...


By Bev ...


By Lizzy ...


Project 1 “Hexagons and Pennants”


Saying “Goodbye” to my fav Doily, the “Paper Doily Sizzlits L”, and ”Hello” to 2 of the new In Colours “Blackberry Bliss” and “Hello Honey”.
The card-base is Naturals White, with the colours of Blackberry Bliss, Hello Honey and neutrals Crumb Cake, Soft Suede featuring.
Have to say I love the new “Moonlight” Designer Series Paper Stack, and was pleasantly surprised by the colour and prints, and with 48 sheets in a pack, $14.50 is a very good price!


The sentiment for the 2 sample cards, are hand coloured using Stampin’ Write Markers in Blackberry Bliss and Hello Honey, and feature the wording “I Freakin’ Love You” from the “Yippee-Skippee!” stamp set, and “You've Got Courage, You've Got Strength” from the “Something To Say” stamp set.


The “Word Bubble” framelits are used to cut the sentiment, but as I wanted the tail of the bubble to tilt in a different direction, I showed the ladies, how using the light and painters tape, how to reverse cut the Bubble.


The ladies also learnt how to make an xtra cute flower using Linen Thread.
As with all cards, each ladies card{s} turned out slightly different, which I always love to see, as just with the flip of a 2 sided cardstock, this can change the whole look of the project!

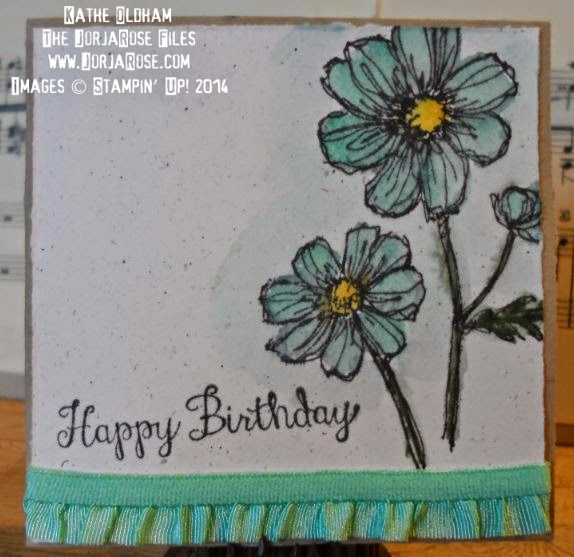
Project 2 “Mini Gift Cards”


The ladies got to make 4 cards each, with the finished size of the cards 3”x3”.
The card-bases were Crumb Cake cardstock, cut 6”x3”, with Naturals White cardstock, cut to 2 7/8”x2 7/8”.
I made up an array of cards ...


The ladies then got to mix and match their choice of colours, Hostess stamp sets {“Simply Sketched” and “Bloom With Hope”}, and techniques: Aqua Painters, Blendabilities and Blender Pens.
As you can see from the list below, we tried many colour combos!
The inside of the cards had either words stamped, or gorgeous images stamped and coloured ...


As a colour/technique comparison, I made up a card using the same stamp, and 3 different colouring combos …


Combo 1 is Memento Ink Pad + Coastal Cabana and Daffodil Delight Blendabilities


Combo 2 is Memento Ink Pad + Aqua Painters and Bermuda Bay, Coastal Cabana and Daffodil Delight Ink Colours {and Pool Party washed around edges} ...


Combo 3 is StazOn Black + Aqua Painters and Bermuda Bay, Coastal Cabana and Daffodil Delight Ink Colours ...


These cards are quick and easy to replicate, and making a small card for a friend can really lighten {and makin'} her day!


Recipe Ingredient List
Stamp Sets: “Bloom With Hope”, “Just Sayin’”, “Petite Pairs”, “Simply Sketched”, “Six-Sided Sampler”, “Something To Say”, “Wetlands”, and “Yippee-Skippee!”
Ink: Baked Brown Sugar, Bermuda Bay, Blackberry Bliss, Blushing Bride, Calypso Coral, Coastal Cabana, Crisp Cantaloupe, Daffodil Delight, Hello Honey, Melon Mambo, Old Olive, Pistachio Pudding, Pool Party, Real Red, Soft Suede, Strawberry Slush, Stampin’ Write Markers Blackberry Bliss, Hello Honey and Memento Ink Pad + StazOn Black
Blendabilities: Cherry Cobbler, Coastal Cabana, Daffodil Delight, Old Olive, Pumpkin Pie, Rich Razzleberry and Color Lifter
Cardstock: Crumb Cake, Natural Composition Specialty Designer Series Paper, Naturals White, Whisper White, Moonlight Designer Series Paper Stack
Punches: Corner, Hexagon, Itty Bitty Accents Punch Pack {Heart} and Petite Pennants Builder
Framelits/Dies: “Paper Doily Sizzlits L”, “Word Bubbles” {reversed}
Xtras: Antique Brads, Aqua Painters, Blender Pens, Crumb Cake Seam Binding Ribbon, Dimensionals, Gold Sequin Trim,  Linen Thread, Stretch Ruffle Trim {Baked Brown Sugar, Coastal Cabana, Crisp Cantaloupe, Pistachio Pudding, Strawberry Slush

Special Tools: Big Shot, Magnetic Platform, Stampin’ Scrub and Stampin’ Cleaner, Stampin’ Trimmer , StazOn Cleaner


Related Posts Plugin for WordPress, Blogger...
Pin It
Blogger Wordpress Gadgets