Last weeks Class, we made two projects {well actually 3!}, an
xtra cute Purse, made from the “Top Note” Bigz Die, in a lovely floral pattern,
with a matching 3”x3” card, and a Christmas card featuring the “Wondrous Wreath”
stamp set and matching “Wonderful Wreath” Framelits…
Project 1 “Top Note”
Purse + Matching 3”x3” Card
This xtra cute Purse is made from the “Top Note” Bigz Die,
and cut 3x in Soft Suede, and 1x in a patterned cardstock {I chose the “All
Abloom” Designer Series Paper Stack}.
The patterned cardstock is cut back to the faux stitch line,
and adhered to one of the Soft Suede Top Notes.
The inside of the purse or gusset comes from a mini paper
bag, which is cut to 3” in height.
The flower is made by using the “Blossom” Punch, x4 in Strawberry
Slush {or Pool Party, or Naturals White}, and then crimped x10 times in the
Paper Crimper. The fibres of the cardstock are then broken down, so you can
split each Blossom into 2, petal by petal {take it slowly!} = 8 Blossoms.
The Blossoms are then placed furry side up, adhered with a Mini
Brad, then a Very Vintage Designer Button is threaded with Linen Thread, a bow
tied, and adhered to the Blossom, over the Mini Brad.
The Blossom is then adhered to the Purse.
The closures for the Purse{s} are self-adhesive Velcro Dots.
For the mini card, Soft Suede cardstock is cut 3”x6” and
folded in half.
Two pieces of Naturals White cardstock are cut to 2, 7/8”x2,
7/8”, then corner rounded with the Project Life Corner Punch.
The smudge or watermark stamp from the “Work Of Art” stamp set,
and is stamped in Strawberry Slush {or Coastal Cabana}, and without re-inking
the stamp, it is stamped again a second time on the cardstock to form two different
shades of pink.
Repeat this step for the inside of the card, by first
stamping the stamp off to remove the bright colour ink, then restamping on the
card insert.
The words “Just For You” are stamped in early Espresso.
A Heart is punched with the “Sweetheart” Punch, using
matching pattered Designer Series Paper, and is backed with contrasting cardstock
{Strawberry Slush}, and adhered with Dimensionals. A small Heart in contrasting
cardstock is punched using the Heart from the “Itty Bitty Accents Punch Pack”.
The small Heart is then adhered to the Sweetheart Heart, and
a small Pearl Basic Jewel is added to the centre of the Heart.
I have added a small Heart to the card insert as well, along with
a small Pearl Basic Jewel.
I wanted to demonstrate to my ladies, how one stamp set can
be used to make an entire card, and the “Wondrous Wreath” stamp set and
matching “Wonderful Wreath” Framelits is perfect for this.
We created a faux door by stamping the Naturals White cardstock
with the “Hardwood” stamp in Sahara Sand, a separate smaller piece is also stamped,
then cut into 4 rectangles to form the panels of the door.
A Brad from the Antique Brads is used to make the door
handle.
On a piece of Whisper White cardstock, the Wreath is first stamped
in Old Olive, then Garden Green, then Real Red to make the glorious multi
coloured Christmas Wreath, which is placed on the door.
Some yummy Real Red Seam Binding Ribbon is wrapped around the
Wreath and tied with a bow.
The sentiment “Happy Wonderful Christmas” is coloured using Early
Espresso and Real Red Stampin’ Markers, and stamped onto Naturals White cardstock.
The sentiment is then cut using the “Apothecary Accents” framelits,
and 2 pieces of Real Red cardstock are also cut using the same Framelits, and
placed behind the sentiment to give a red border.
Adhered with Dimensionals, the final touch is my now signature
Glimmer Paper Candy Dots in a lovely sparkling Red.
As the cardbase is Naturals White, there is no need for a lining,
so for the card insert, the words “May happy moments & cherished memories
surround you with joy this season” is stamped in Early Espresso directly onto
the Naturals White cardstock.
The “Dotted Scallop Ribbon Border” Punch is used to cut a
strip of Red Glimmer Paper, and is placed as a border on the bottom of the insert,
for a bit of bling!
Wah-lah … “Wondrous Wreath” Christmas Card done!
Thanks for taking the time to stop by, and if you
would like to make a Stampin’ Up! purchase online, please head on over to my Stampin’ Up! website.
Happy craftin’,
Kathe.
#CreateWithKathe #JorjaRoseFiles
“Hardwood” Background Stamp
“Wondrous Wreath” Stamp Set
"Work Of Art” Stamp Set
“Top Note” Bigz Die
Recipe Ingredient List
Stamp Sets : “Hardwood”, “Wondrous Wreath”, Work Of Art”
Ink : Coastal Cabana, Early Espresso, Garden Green, Old Olive, Real Red, Sahara Sand, Strawberry Slush
Stampin’ Write Markers : Early Espresso, Real Red
Cardstock : Glimmer Paper in Red, Naturals White, Pool Party, Real Red, Sahara Sand, Strawberry Slush, Whisper White,
Designer Series Paper : “All Abloom” Designer Series Paper Stack
Saturday
I had a Work Shop with Bev and her friends, and we made the sliding spinning
card that I test ran on our Crafty Ladies last week {will do a separate post in
the coming days}.
THEN
Monday night I taught at the “Women Connecting” Craft Group, and we made 2
sliding spinning cards.
The ladies
had the cards done and dusted, and we finished up early.
As the class
is steadily increasing in numbers, I had to make up 35 kits of each card, which
made 70 kits in all to be made!!!
I have just
had to order new blades for my Stampin’ Trimmer!
{I will
do a separate post in the coming days}.
This
brings us to our weekly “Create With Kathe” Craft Class on Thursday.
We made 2
cards, the first a d lovely floral card featuring the “Vivid Vases” stamp set
and the Blendabilities Pens, the second card was a ship in a bottle, where we
carried on with last weeks theme and used the Apothecary Accents Framelits to
make the bottle.
Project 1 Floral Card featuring “Vivid Vases” Stamp
Set
The card
base is Naturals White, layered with Basic Gray cardstock, and then Coastal
Cabana cardstock, which has been embossed with the “Decorative Dots” Embossing
Folder. The corners are rounded with the Corner Rounder Punch
Naturals
White cardstock and Background Designers Series Paper Stack in Coastal Cabana
are punched with the Scalloped Tag Topper Punch and then sponged with Crumb
Cake.
Random splotches
from the “Gorgeous Grunge” stamp set in Coastal Cabana are stamped on the
Naturals White Tag.
The “Vivid
Vases” stamp is stamped on Whisper White cardstock then coloured with the Blendabilities
Pens, and then fussy cut and adhered with Dimensionals to the Naturals White
Tag.
The “Hey
There!” from the “Just Sayin’” stamp set are stamped with Black StazOn on
Vellum, then cut with the “Word Bubbles” Framelits.
The rose
is made using the same Background Designers Series Paper Stack in Coastal
Cabana and the Spiral Flower Originals Die, and several flowers are punched
using the Petite Petals punch, and placed either side of the flower and in the
middle of the spiral flower.
The finishing
touch is the colouring of the Linen Thread, Vintage Faceted Designer Buttons
and the Pearls using the Coastal Cabana Blendabilities marker.
Inside
the card, the words “Everything with be OK, even if we can’t see what OK is yet”
is stamped from the “Really Good Greetings” stamp set, using the Basic Black
and Bermuda Bay Stampin’ Markers, and of course another splotch form the “Gorgeous
Grunge” stamp set in Coastal Cabana.
Wah-lah Floral
Card featuring the “Vivid Vases” stamp set done!
Project 2 Ship In A Bottle Card
I first
saw a similar card on Pinterest, which gave an awesome Tutorial via "Stamp With Bernie" on how to make
the bottle using the Apothecary Accents Framelits.
I followed
the instructions and then made a template in clear plastic, which the ladies used
to draw around the edges of the Apothecary shape, to create the bottle.
The card
base is Soft Suede, which has been sponged in Crumb Cake.
The next
layer is Marina Mist, which has been stamped randomly with the stamps from “The
Open Sea” stamps in Crumb Cake, and the edges are sponged in Marina Mist, with
one corner being rolled, and then sponged.
The top
left corner has a square of Crumb Cake cardstock which has been faux stitched
with the Piercing Tool and the “Essentials” Paper Piercing Set, and placed
behind the rolled corner.
The
bottle is Whisper White cardstock, and is cut using the Apothecary Framelits, and
then the Bottle template is placed over the shape and drawn around, and then
fussy cut.
The bottle
is first outlined in Black with the Basic Black Stampin’ Marker.
The ship is
from “The Open Sea” stamp set, and is stamped on a slant in Black StazOn, with
the sails lightly coloured with the Crumb Cake Stampin’ Marker.
The sea
and a touch of the sky are sponged with Marina Mist.
Once dry,
the remainder of the bottle is sponged with So Saffron, and when that layer is
dry, the edges of the bottle are sponged in Chocolate Chip.
The bottle
is adhered with Dimensionals, and Bakers Twine is tied around the neck of the
bottle.
A bottle
top {you can pick up a bag of 100 at the grocery store for around $3} is then
squashed in the Big Shot and the gum seal removed.
Stamped
on a scrap of Naturals White in Black StazOn are the words “1 great life.” from the stamp set “Something
to Say”, and is punched out using the 1” Circle Punch, and then sponged in
Chocolate Chip, this is adhered to the squashed bottle top.
The
Crop-A-Dile is then used to punch a small hole through the metal, which the
Bakers Twin is then threaded through.
The
bottle top is adhered to the card with a Dimensional and the finishing touch is
the Crystal Effects which is added the surface of the
bottle top to give a raised and glossy effect.
This is then left overnight for the Crystal Effects to dry.
The inside of the card has a piece of Naturals White cardstock which
has been sponged with Crumb Cake, and has an anchor stamped at the bottom
corner, this is adhered with double sided sticky tape to the card-base.
Wah-lah
Ship In A Bottle Card done!
Stamp Sets Featured ...
“Gorgeous Grunge” Background Stamp Set
“Just Sayin’” Stamp Set
“Really Good Greetings” Stamp Set
“Something To Say” Stamp Set
“The Open Sea” Stamp Set
“Vivid Vases” Stamp
Recipe Ingredient List
Stamp Sets: “Gorgeous Grunge”, “Just Sayin’”, “Really Good
Greetings”, “Something To Say”, “The Open Sea”, “Vivid Vases”
Ink: Black StazOn, Chocolate Chip, Coastal Cabana, Crumb Cake, Marina Mist,
Momento Tuxedo Black, So Saffron
Tuesday
was the launch of the new Stampin’ Up! Catalogue, and I can't help but add more
items to my “Wish List”!
Unfortunately
I squealed so loudly with excitement {for the new Catty} that I lost my voice for 3 days!!!
This
weeks craft class, we had 2 new ladies attend, Lynn and Joy, which brought the class
number to 5.
Both of Thursday’s
cards feature the “Apothecary
Accents Framelits Dies”, and are used in two different ways …
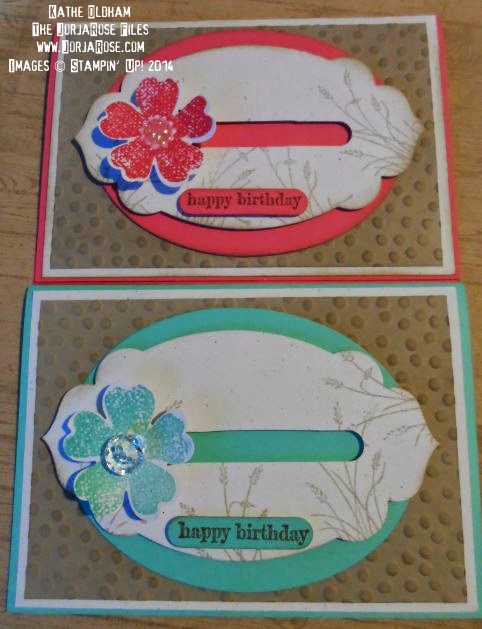
First up
we did a Spinning Sliding Card, which is a c.a.s.e. of a card I saw in Jacque’s
swaps, but sorry, I do not know who the original artist is.
The
original was in Crisp Cantaloupe, but I went with either Coastal Cabana or
Strawberry Slush ...
This card
was a very good practise, as Monday night I am teaching this to the “Women
Connecting” Craft Class, and there will be 35 ladies there!
I needed
to know in advance if there would be any problems teaching this intricate card
to such a number!
This card
is all about the layering, and of course the 2x 10c pieces of real money!
Colours
used are Coastal Cabana {or Strawberry Slush}, Crumb Cake and Naturals White,
with stamp sets featured “Flower Shop”, “Something To Say” and “Wetlands”, and
punches “Pansy”, “Word Window”.
The second card we made is a gorgeous
shabby chic mason jar of butterflies, with the words “Live the life you've imagined” from the “Really Good Greetings” stamp set.
The
mason jar is made using the Apothecary Accents Framelits Dies, and is cut in Vellum,
and backed with Naturals White.
The
butterflies that spill out of the jar were cut using the Beautiful Wings
Embosslits Die, which cuts and embossed at the same time, along with the “Papillon
Potpourri” stamp set and matching “Bitty Butterfly” Punch.
The
finishing touch is the Stampin’ Glitter “Dazzling Diamonds” on the butterflies’
wings.
The
colours used in this card are Soft Suede, Naturals White and Marina Mist, which
go so well together, and were an inspiration I drew on from a card that Jacque
had made at her recent class her in Nelson.
Next
week, we use the “Apothecary Accents Framelits Dies” again, this time to make a
ship {from “The Open Sea” stamp set} in a bottle … stay tuned!
Stamp Sets Featured ...
"Flower Shop" Stamp Set
“Gorgeous Grunge” Background Stamp Set
“Papillon Potpourri” Stamp Set
“Really Good Greetings” Stamp Set
“Something To Say” Stamp Set
“Wetlands” Stamp Set
Recipe Ingredient List
Stamp Sets: "Flower Shop", “Gorgeous Grunge”, “Papillon Potpourri”, “Really Good Greetings”, “Something To Say”,
“Wetlands”