Cotton Butterfly

Free background from VintageMadeForYou
Showing posts with label Scalloped Tag Topper. Show all posts

Tuesday 29 March 2016

Easter Treats …


Easter Treats …
The Easter Bunny forgot to come in our household this year.
I totally forgot to lay the treats out Thursday night/Friday morning, my hubby said: “that’s okay, JorjaRose thinks the Easter Bunny comes Saturday night/Sunday morning” … thank goodness I’m saved!

Anyways Sunday rolled around, and or course I had forgotten again!!!
I saw the remnants of the treats that had been eaten, and asked JorjaRose about it …
She said: “Mum you were half asleep in bed, and I asked if I could deliver the goodies to Reilly and me!” She used her southern accent of course, and rolled the “R” in Reilly! My family comes from Gore, and she really has the Southern accent and rolls all the “R”’s!!!   It's so cute!


So now I think I have failed the 2016 Easter Bunny, but hop{e} to be back on top for Easter next year.
So this is what the Easter Bunny brought to our lovely home last year ...


And how cute is this wee Bunny from the year before {2014} …


From my family to yours wishing you a safe and Happy Easter!


Saturday 9 January 2016

Happy New Year! I Finally Got My Craft On ...


Happy New Year!
I finally got my craft on yesterday afternoon, and whipped up this little number …


It was for my bestie Megan’s Birthday, and what a birthday she had!!!
Meges had lunch out with her 3 daughters, and then in the evening, a whole bunch of us went out to dinner to celebrate!
We had dinner at “Poppy Thai” in Richmond, and there were approximately 12 of us dolls that were able to make it, AND I was the only blonde {except for Anna}!
We must have made a bit of noise because we had so much fun.
You know me, I am a foodie, but forgot to take a photo of my Starter, which was “Poh Pieh Puck”, eight vegetarian spring rolls with vermicelli and vegetables, served with sweet sauce.
For my Main, I had “Pad Priew Wan” Poppy Thais’ sweet and sour sauce home made to perfection then stir fried with fresh seasonal vegetables with Chicken ...


And of course I had to have Dessert, which was “Chocolate Lava Cake”, served with Ice Cream, Strawberries and a Passionfruit Coulis … oh yum!!! ...


Now back to the gorgeous card…


I have been wanting to try out my new set of Dies, the “Sizzix Gatefold with Jar Pop-Up”, and this was the perfect occasion.


I also got to try out some of my new stamps sets from the new Occasions Catty,  ”Birthday Blooms”, “Grateful Bunch”, and “Timeless Textures”. 
The "Timeless Textures" stamp set is great for layering images, here I stamped firstly in Sahara Sand, then overlaid the next stamp in Tip Top Taupe ...


I added a belly band to the card, as it sat better with it.   As you can imagine, the card was very full in textures with all those flowers!


I also added a Tag, so Megan can also use this as a Bookmark later on!


All in all, I was very pleased with the way this card turned out.
And of course the pressie was wrapped in re-purposed Stampin’ Up! packing paper, with a belly band that has been embossed, and some colour co-ordinated butterflies with my signature Pearls added! 


Hmmmm … what shall I make tomorrow?!!!
The “Sky Is The Limit”!!!

Sending paperhugs your way,
Kathe. 


Built for Free Using: My Stampin Blog

Monday 22 June 2015

Sally and Kathe’s Stampin’ Up! Sneak Peak Launch


Well, I have finally downloaded the photos from our Catty Launch, back on Sunday 31St May!
We had an amazing afternoon of fun and laughter, and we, along with our guests really enjoyed the afternoon.


At each place setting, there was a new catty, along with a handmade paper-crafted gift from Sally, and a 3”x3” card {cased via Glenda Calkins from “The Stamp Camp”} in the new In Colours, along with a bookmark {cased via Erica B. Cerwin from “PinkBuckaroo Designs”}, showing ALL the new In Colours, made via moi.


As each guest arrived, they were given a lucky number (made with my Ornate Tag Topper Punch and Perforating Blade}, as we had a Prize Patrol table, lined up with 27 gifts!
That meant each guest also went home with a prize, and 7 lucky ladies received a second prize from the table. There were stamp sets, ink pads, Stampin’ Write Markers, a Stampin’ Scrub + many other goodies on the table.


Sally and I had a display table {whoopsee – forgot to take a photo!} of samples, Sally concentrated on samples made with the new Gift Bag Punch Board, and I concentrated on samples using the new In Colours.


We split the guests into two groups and we both taught our project, Sally taught her gorgeous Gift Bag, using the NEW Gift Bag Punch Board, and I taught a card, that had a bookmark attached {again using my Perforating Blade}.


We then took a wee break for some yummy afternoon tea.
Sally made an amazing two layered cake and decorated it as a wedding cake, a two of our guests {who just happened to be sisters} were celebrating their 50th wedding anniversary!

We then cracked on and switched the groups up and re-taught our projects.

We all had a really lovely afternoon, and met some new friends, and can't wait to do it all over again!

Thanks for stopping by, please feel free to leave a comment.

Happy craftin’

Kathe.


Built for Free Using: My Stampin Blog

Monday 23 March 2015

Nelson Extravaganza: Saturday 21st March 2015


This past Saturday, I taught at Nelson Extravaganza, to 39 lovely ladies.
"Nelson Extravaganza" is new to Nelson, this is the first time we met, however we will be holding 3 Extravaganzas this year.
I taught my project, a clean and elegant "Thank You Card With Emboss Resist", along with 4 other teachers, Sally Rice, Sally Robertson, Jacque Williams and Rebecca Palmer ...


"Thank You Card With Emboss Resist" by Kathe Oldham


"Happy Easter Berry Basket" by Sally Rice


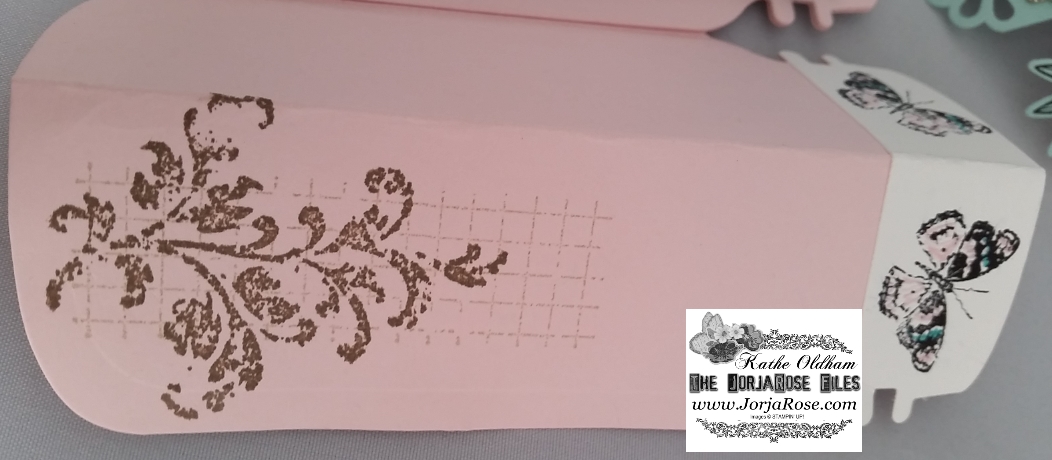
"Butterfly Tiny Treat Box" by Sally Robertson


"Sheltering Tree Note Card Set" by Jacque Williams


"Braided Card & Mini Treat Bag" by Rebecca Palmer

I was really looking forward to sharing my crafting knowledge, and had a really enjoyable day with some very lovely ladies.
One of the bonuses of a day like this is, that it is "bring a plate for a shared lunch", these ladies are very talented home cooks {one is even the Food Editor for "New Zealand House and Garden" magazine} and here's a glance of the yummy food I selected for my lunch ... 


We held the Extravaganza at Waimea Old Boys Rugby Club, and here are my tables all ready to go ...


My guests had a packet gift wrapped at their place setting, with the Annual Catalogue, Occasional Catalogue, Sale-A-Bration brochure, and 2 Sale-A-Bration flyers, along with their personalised name tag, which matches mine ... 


and I had on display all of my recent Classes ...


I was very prepared, as I had 50 packs cut, 2 weeks in advance ...


And had also pre-cut all the butterflies - yes I cut 100 butterflies the previous weekend {8 days in advance} - and it only took 4 hours!!! ...


I was so pleased that I had done so much prep in the preceding weeks, as I ended up with JorjaRose at A&E {Accident and Emergency - Emergency Room} twice this week! 
She fell off of the Flying Fox at school on Wednesday, and after Wednesday's visit to A&E, she had a splint put on her left arm/wrist with a possible break to the small bones, but unable to see on the x-ray. Told to re-visit the GP in a weeks time if she was still in pain. 
She was in so much pain {more so than when she did the Buckle Fracture to her right wrist}, that I took her back to A&E on Friday, and had also noticed a very large bruise to her right temple. Also mentioned how she flinched anytime you got near her right elbow {was previously band-aided by receptionist at school}, turns out after x-rays were taken she has chipped her elbow with particles floating. So now she has a splint on her left wrist and a sling on her right arm + slight concussion!!!


The project I designed for Nelson Extravaganza is a clean and elegant  "Thank You" card with Emboss Resist ...

Techniques covered are Emboss Resist, Embossing, 3 Layer Stamping, Scoring with the Simply Scored Scoring Tool, Die Cutting, Negative Detail, Punching {I had all three Tag Topper Punches to choose from - Angled Tag Topper, Ornate Tag Topper and Scalloped Tag Topper}, and Layering with Dimensionals/Vellum/Cardstock.


Embellishments included Pearl Basic Jewels, rosette trim from the Artisan Embellishment Kit, and Pink Pirouette Seam Binding.
Stamp sets featured are "Painted Petals" and "Lotus Blossom".

On the card insert, the "Lotus Blossom" is stamped in Melon Mambo, Blushing Bride and Blushing Bride stamped off once. Followed by Clear Stampin' Embossing Powder.


Wah lah ...  "Thank You Card With Emboss Resist" done!

Thanks for taking the time to stop by, and if you would like to make a Stampin’ Up! purchase online, please head on over  to my Stampin’ Up! website.

Happy craftin’,
Kathe.


Recipe Ingredient List
Stamp Sets : "Painted Petals" and "Lotus Blossom" {SAB 2015}
Ink Pads : Blushing Bride, Melon Mambo, Pear Pizzazz, Soft Sky
Cardstock :  Blushing Bride, Soft Sky, Strawberry Slush, Whisper White, Vellum and "Irresistibly Yours" Specialty Designer Series Paper {SAB 2015}
Framelits : "Butterflies" Thinlits, 
Punches : Hearts Border, Project Life Corner, Scalloped Tag Topper 
Ribbon : Rosette Trim from the Artisan Embellishment Kit, Seam Binding in Pink Pirouette
Xtras : Stampin’ Dimensionals, Stampin’ Emboss Powder in Clear, Stamping Sponges

Special Tools : Big Shot, Heat Tool, Pearl Basic Jewels, Simply Scored Scoring Tool, Stampin’ Scrub and Stampin’ Cleaner, Stampin Trimmer,
Related Posts Plugin for WordPress, Blogger...
Pin It
Blogger Wordpress Gadgets