

The day
that Cyclone Ita hit!!!
We were
smack bang in the middle of craft class, when the 1st power cut hit
at 2pm, and we were without power for about 45 minutes.
Luckily
we weren't using any electricity other than lighting on today’s project.
The second
power cut hit at 8.15pm and fortunately all those that had booked for the evening
class had cancelled, as some of the roads were out due to trees falling over!
Thursday’s
class we had a full house with Bev, Jenny, Lizzy, Raewyn, Ruth, and Sue in attendance.

We made a cute “Envelope Scrapbook Album”, with the help of my new Zutter!!!

I made 3
samples in advance using Designer Series Paper “Watercolor Wonder”, and retired
but available on the Clearance Rack “Beau Château”, “Tea For Two” and this
afternoon, because I couldn’t help myself and it’s Easter, I made another using
the “Cheerful Treat” DSP!!!

The
Stampin’ Up! Envelope Punch Board is used to make 8 envelopes. The cardstock
started out as 6”x6” and matched on the Board to make an envelope to fit a 3”x4”
card. The first score mark is at 2 5/8”.
Crumb
Cake is used for the cover of the Album, and I experimented with stamping in “Sahara
Sand” the “En Francais” and “Hardwood” background stamps.

“Watercolor Wonder” Designer Series Paper


The “Needlepoint
Border” Embossing Folder are featured and brushed with Ink, from either of Island
Indigo, Sahara Sand, and Soft Suede.
“Natural
Composition Specialty” is sponged with Island Indigo or Soft Suede, then the “Scalloped
Tag Topper” Punch is used at both ends. Add some gorgeous “Crochet Trim”, add a
bow of either Bakers Twine or Twine, and add a safety pin from the Vintage Trinkets.

“Beau Château” Designer Series Paper,
retired but available on the Clearance Rack


The Sentiment
is then layered on top …
On “Naturals
White”, the sentiment is from the “Geometrical” stamp set, and hand coloured using
a combination of Old Olive, Island Indigo, and Early Espresso Stampin’ Markers.
Using the “Chalk Talk” Framelits and Big Shot, cut out the sentiment, then add
a cute little Antique Brad, and some Pearls to the “o”s, and then layer on
Dimensionals.

“Tea For Two” Designer Series Paper,
retired but available on the Clearance Rack


A line of
cute ribbon in “Ruffle Stretch Trim” in Baked Brown Sugar, and on the retired
Beau Chateau Album, I have used the retired “Pleated Satin” ribbon in Blushing
Bride, is placed on the bottom edge of the Album{S}. The Cheerful Treat Album,
has Strawberry Slushy Ruffle Stretch Trim.

“Cheerful Treat” Designer Series Paper,
retired but available on the Clearance Rack


After
using the Zutter to bind the Album, I have tied various ribbons in “Stretch Ruffle
Trim”, “Chevron Ribbon” and “Stitched Grosgrain” to the coils.
To finish
the project off, each Album has a matching Pen, with a piece of matching DSP
Cardstock cut 4.5’x1/2” and is placed around the outside of the pen and
inserted into the barrel.
Wah lah “Envelope Scrapbook Album” done!

"Envelope Punch Board"

“Watercolor Wonder” Designer Series Paper
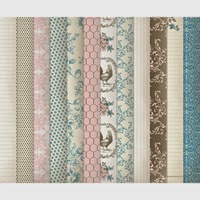
“Beau Château” Designer Series Paper,
retired but available on the Clearance Rack

“Cheerful Treat” Designer Series Paper,
retired but available on the Clearance Rack

“Tea For Two” Designer Series Paper,
retired but available on the Clearance Rack

“Geometrical” Stamp Set

“En Francais” Background Stamp

“Hardwood” Background Stamp
Recipe Ingredient List
Stamp Sets: “En Francais”, “Geometrical” and “Hardwood”,
Ink: Island Indigo, Sahara Sand, Soft Suede, and
Stampin’ Markers Island Indigo, Old Olive, and Early Espresso
Cardstock: Crumb Cake, Island Indigo, Naturals
White, Natural Composition Specialty, “Watercolor Wonder”, and retired but available on
the Clearance Rack “Beau Château”, “Tea For Two”, and “Cheerful Treat” DSP
Punches: “Corner”, “Scallop
Tag Topper”
Framelits/Dies: “Chalk Talk” Framelits
Xtras:
Antique Brads, Bakers Twine, Dimensionals, Pearl Basic Jewels, Twine, Vintage
Lace, Vintage Trinkets
Special Tools: Big Shot,
Big Shot Magnetic Platform, Envelope Punch Board, Stampin’ Scrub and Stampin’
Cleaner,
Stampin’ Trimmer and of course the “Zutter”!!!


