Cotton Butterfly

Free background from VintageMadeForYou

Saturday, 7 September 2013

Hello Sweet Friend

“Hello Sweet Friend”

We all have that one friend, you know the one, well this card is dedicated to Jen …
This idea is case’d from a recent blog/video post by France Martin aka Frenchie entitled “Lattice Die inside the Framelits Window”.

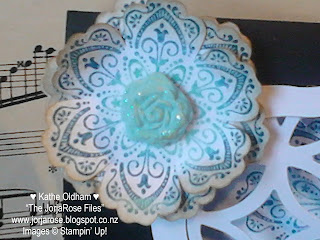
I used the ‘Rock “n” Roll” technique to create the peacock like colour on the flowers.
First, stamp the flower onto the “Coastal Cabana” ink pad, then with the darker colour, this time I used “Not Quite Navy”, roll the edge of the stamp around the ink pad, thus the “Rock ‘n’ Roll” technique is created!
I always use a lighter colour, then the darker colour, as I do not want to transfer ink from a darker pad to a lighter pad.
I have stamped and punched 3 flowers, then sponged with Crumb Cake, layered, and Braded.   The Brad is hidden under the handmade flower.
To make the flower, knead 2 drops of “Coastal Cabana” ink into a pinch of “Simply Pressed Clay”.  Sprinkle some Dazzling Diamonds in, then press into the “Buttons and Blossoms Simply Pressed Clay Molds”.  I always make in advance, as the Buttons and Blossoms need a couple of hours to air dry, or 10 minutes in the freezer.
Use the “Labels Collection” Framelits to create the window in the Basic Black cardstock, and then layer 2 of the Framelits to create the border around the outside of the window, cut from Whisper White, use a Stick On Note to keep in place.
Cut the “Lattice” in Whisper White and adhere behind the window, and then adhere the border on top of the window.
The words are stamped in “Not Quite Navy” then punched using the side of the “Decorative Label” punch, and then punched again using the opposite side. This is a quick and non-expensive way of making a smaller shape. The words and are then sponged with “Crumb Cake” and lifted by using Dimensionals.
I have “anchored” the card by using a Candy Dot on the bottom right of the card.


Stamp Sets: “Mixed Bunch”, “Petite Pairs” and “Six-Sided Sampler”
Punches: “Blossom” and “Decorative Label”
Framelits/Dies: “Lattice”, “Labels Collection”
Ink Pads/Inks: “Coastal Cabana”, “Not Quite Navy”, “Crumb Cake”


Special Tools: Big Shot, Buttons and Blossoms Simply Pressed Clay Molds and Simply Pressed Clay, Candy Dots, Dazzling Diamonds, Dimensionals, Stick On Notes, Sponges (for sponging!)

Tuesday, 3 September 2013

Card Off: Friday Night With Jen

Friday night, my best friend Jen and I had a "Card Off” ...
With Father’s Day on Sunday, we decided that would be our first card … 

Challenge 1: Father’s Day and “Hexagons”

I have to say both cards turned out really well, and although we had the same theme, our cards turned out totally different!


 "Fathers Day" card by Jen


"Fathers Day" card by Kathe


♥ Products Shared: Stamp Sets “Vintage Verses” and “Six-Sided Sampler”, with matching “Hexagon” punch and “Honeycomb” embossing folder
♥ Jen’s Products: Stamp Set “Collage Curios”
♥ Kathe’s Products:  DIY bubble wrap taped to a clear mount block!

 Challenge 2: Shabby Chic

Jen made a gorgeous vintage floral card whilst I went shabby chic with my favourites the “Dress Up” Framelits ...


  "Vintage Floral' card by Jen


"Shabby Chic' card by Kathe


♥ Jens Products: Stamp Set “”Afterthoughts” and “Mixed Bunch”
Punches “Blossom”, “Boho Blossoms” and “Scallop Trim Border“
♥ Kathe’s Products: Stamp Set “That’s The Ticket” and “Petite Pairs”
Punches: “Ticket Duo Builder”, “Large Tag” and “Dress Up” Framelits

Special Tools: Brads, Bubble Wrap, Candy Dots, Crop-a-dile, Dimensionals, Doilies, Embossing Powder (Gold), Eyelets, Heat Tool, Inks, Ribbon, Sponges (for sponging!), and my new favourite Washi Tape!


Mmmmm … wonder what our next “Card Off” theme will be?!!!  

Storage Ideas With Kathe: Recycling 101: {AVON} Shampoo/Conditioner Bottles


Ever wondered what to do with that empty {AVON} Shampoo or Conditioner bottle?
Well wonder no more!
I created these cute Hold Alls, could also be used for storing MakeUp Brushes, or for storing your Stampin’ Up! supplies …

Instructions:
Empty bottle.
Cut bottle open, you will initially need to use a sharp knife like a steak knife, and then finish off with strong scissors.
Cut the opening so that it is the same height from the base of the bottle, cut all the way round.
Make sure you thoroughly wash and dry the empty bottle.
Peel the sticker off of the front of the bottle, you may like to use some “De-Solv-It” to get rid of the sticky residue.
Finish with Washi Tape.
I have used an arrow Washi Tape to fold over the top part of the empty bottle to avoid any sharp edges.


Wah Lah … you know have your very own tres’ chic storage container!


Sunday, 1 September 2013

Stampin' Up! Demonstrator


Well ... I finally did it!!!
I just created my Stampin' Up! Demonstrator website.
Please take the time to take look.
This is a WIP (Work In Progress), so bear with me!

Friday, 30 August 2013

MakeUp Haul - L'Oreal

Anyone that knows me knows that I can spot a bargain a mile away!
But I have to say; yesterday's MakeUp Haul was one of my best yet!
The {my} deal ...
♥ L’Oreal: Buy 2, get 1 FREE
♥ L’Oreal: Spend $65+ and receive a FREE "Gift With Purchase", known in the game as a “GWP”
♥ L’Oreal: Accumulate $200 on L'Oreal, and receive $20 off your next L'Oreal purchase
So .... after taking all of the above into consideration, my purchase price that I paid was {only} $39.98

In my Makeup Haul I received:
1x L’Oreal Color Riche Quads E1 “Beige Trench”
1x L’Oreal Color Riche Quads E3 “Smokey Iridescent Bronze“
1x L’Oreal Color Riche Quads E6 “Eau de Rose”
GWP 1x L’Oreal Color Riche Quads P14 “Luminous Golden Black”
GWP 1x L’Oreal Color Riche Nail Lacquer “Femme Fatale”
GWP 1x Duo Eye Shadow Brush
GWP 1x Makeup Purse


+ I already have {also pictured} the gorgeous L'Oreal Color Riche Quads E4 “Marron Glace”, so now I can say I am officially all L'Oreal’ed out!


Related Posts Plugin for WordPress, Blogger...
Pin It
Blogger Wordpress Gadgets