Cotton Butterfly

Free background from VintageMadeForYou

Friday 8 November 2013

It's Official, I'm Addicted To "My Digital Studio"!

Soooooo I have just become addicted to “My Digital Studio
Stampin’ Up! have been running a promotion all week, and have just relaunched the Downloads at xtra special prices for 24 hours only!

This was my first project:


All Daily Deals Back on Sale …

Hopefully this week has gotten you inspired to start creating with MDS.  We know there were quite a few of you that missed out on some of the Daily Deals, so as one last final surprise to end Digital Scrapbooking Days, the My Digital Studio team has decided to put all of the Daily Deals back on sale for 24 hours! Get your orders in between November 8 at midnight and November 9 at midnight (MT).


Here are the downloads that will be on sale:
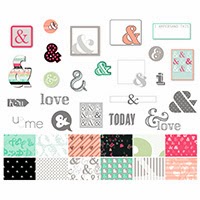
  • Amped Up Ampersands Kit (item 134844)
  • Hello There Kit (item 133374)
  • All Time Fave Photobook Template (item 132915)
  • Modern Medley Overlays Kit (item 134839)
  • Be Brave Pocket Cards (item 134840)
  • Nobody's Business Photobook Template (item 134812)
  • Autumn Traditions Kit (item 127600)
  • Afternoon Daydream Kit (item 130861)
I seriously suggest you get on the digital bandwagon and get downloading!!!
Just head over to my Stampin' Up! Blog www.katheoldham.stampinup.net select “Products” and then “Shop Now”.

The goodies I purchased are
#130646 My Digital Studio $27.95
#134844 Ampersands $6.98
#133374 Hello There Kit $6.98
#134839 Modern Medley Overlays Kit $5.48
#132812 Nobody’s Business Photobook Template $13.98
"Ampersands"
 
"Hello There Kit"
"Modern Medley Overlays Kit"
 
"Nobody’s Business Photobook Template"


And I just had to purchase the "Venetian Romance" Designer Series Paper {#134735 for only $6.95}, I just ♥ the colours Crisp Cantaloupe, Island Indigo, Pistachio Pudding, Soft Suede, Tangerine Tango, Very Vanilla
"Venetian Romance Designer Series Paper"


Until then, Create with Kathe …


Wednesday 6 November 2013

Card Off With Jen: Noah’s Ark Double Slider Card


Check out these adorable Double Slider Cards that I made with Jen.
The Apprentice has well and truly out-done the Tutor this time!!!

Our theme for this challenge was “Noah’s Ark”, a Double Slider Card AND using the stamp set “Zoo Babies”.

This idea is case’d from a Pin I found on Pinterest by Michelle Last

Our Ark’s took the most time (1 ½ hours) to make, and even then I was not completely happy with mine!

Watch this space though, as I will endeavour to make my Ark a lot better in the coming months, as I gear up to teach this card at my local church craft class “Women Connecting”.

To make the waves/sea I tore my cardstock, whereas Jen freehand cut hers with the Stampin’ Up! Paper Snips.

Yet again, although we both had the same theme and materials to work from, and our projects turned out completely different!

 “Noah’s Ark” Double Slider Card by Kathe Oldham {above}
 
“Noah’s Ark” Double Slider Card by Jen Hassloch {above}

 
“Noah’s Ark” Double Slider Card by Kathe {top card} and Jen {bottom card}

“Noah’s Ark” Double Slider Card  {extended}
by Kathe {top card} and Jen {bottom card}

Stamp Sets: “Zoo Babies”, “Petite Pairs” and “Chalk Talk”
Ink: Pistachio Pudding, Basic Gray, Black Staz On, and Watercolour Pencils
Punches: Boho Blossoms
Framelits: Labels Collection
Embossing Folder: Woodgrain

Special Tools: Big Shot, Candy Dots, Dimensionals, DSP "Beau Chateau" (My Digital Studio download), DSP Paper Stack “Festival Of Prints” (My Digital Studio download), Ribbon Chevron “Crushed Curry”,  and Ribbon Stitched Grosgrain “Early Espresso”

What's Up @ Kathe's Crafty Class?!!

Hi Crafty Ladies,

These are the projects we made last week @ Kathe's Crafty Class, come along this week and enjoy the fun ...

Thursdays, 1pm>3pm and 7pm>9pm


So I have decided to take the plunge and start doing Classes here from home.
I will be running 2 Classes a week to start with, on Thursdays, 1pm>3pm and 7pm>9pm.
Cost will be just $10, and Classes will continue to run each Thursday until further notice!!!
YOU make two amaze-balls projects, come along and enjoy the fun!
I am flexible if you have school aged children, just come 1/4 hour early to finish by 2.45pm

Bookings essential (as I make up kits), thanks!

Hot Offers (please see below flyers) ...
♥ Envelope Punch Board, only $38.95, used in both of last weeks projects


Thinlits Card Dies, only $67.95 per set, make those fancy fold cards with ease, 2 sets to choose from and each set comes with a number of AWEsome dies!!!


♥ Christmas Single Stamps, available to order till 31st January 2014!!!


♥ 20% off Tag It Bundles!
Create a pretty package this year and grab a bargain!


♥ My Digital Studio Seasonal Sale
30% off selected downloads for cards, kits, pages, tags and frameables 


♥ Undefined Stamp Carving Kit
Design and carve your own stamps … think of the possibilities!
Taking preorders for official release date of 12th November


Check out all my H♥T Stampin' Up! offers, H♥T of the press @ my Stampin' Up! website.

P.S. Leann from Stamps Plus has for sale her brand spanking new Stampin' Up! Gift Bow die, I ♥ it!!!
I already have one, and will demonstrate mine at this weeks "Kathe's Crafty Class".
To get some amaze-balls ideas in how to use the die, please got to my Pinterest page. 

Till next week!

Best wishes,
Kathe.

Friday 1 November 2013

Kathe's Crafty Class

So started my "Kathe's Crafty Class" with a rip and a roar, and my first WOW project seemed to really startle the ladies!!!

Project 1 Swallowtail Double Slider Card {looking back the card was a tad harder than I anticipated!!!}

Project 2 Birdhouse and matching Petite Purse


The Swallowtail Double Slider Card turned out better than I had anticipated  but took 1 1/2 hours to make!

Stamp Sets: “Swallowtail”, “Chalk Talk"
Punches: Boho Blossoms, Decorative Label, Small Heart
Embossing Power: White


Special Tools: Aqua Painters, Antique Brads, Big Shot, Candy Dots, Dimensionals, Plastic, Ribbon, Stampin' Write Markers 


The Bird House is made using the Mini Milk Carton die, and the Dress Up Framelits for the scallops on the roof!

Stamp Sets: “Mixed Bunch”, “Season Of Joy” (R)
Punches: Bird Builder, Boho Blossoms, Circle 1"
Dies/Framelits:  Petite Purse, Mini Milk Carton, Dress Up


Special Tools: Big Shot, Brads, Dimensionals

_______________________________________________________________________________

AND had another successful class yesterday, had the two gorgeous Sally’s at the 1pm and Angela from Angela’s Attic at the 7pm class.
We made 2 projects, both using the new Stampin’ Up! “Envelope Punch Board” {#133774 $38.95}.

Project 1 was a Tabbed File Folder Card, featuring the Chalk Talk stamp set and matching Framelits, side note if you purchase this as a set, you save 15%!!!

Project 2 is a Tabbed Gift Card Holder, which is Christmas themed, and can be adapted to any occasion.

Tabbed File Folder Card

Fold cardstock in half, Use Punch Board and line up corner of the blade, Punch and also Punch at 3”, cut off excess with Stampin’ Trimmer, flip and repeat on reverse side.
The front of the card has the “Shop Around” wheel roller in Basic Grey, rolled/stamped twice, and the Chalk Talk stamp is on the front to convey the special message.
Stamp the large Bread Tag stamp twice in White Staz On on black cardstock, I then cut the word “something” out with my Paper Snips. It is then layered with Dimensionals over the original word ”something”, use the matching Chalk Talk Framelits to cut the Tag, and then the Tag is also Dimensionaled on the card.
I used 2 different Washi Tapes on the 2 Tabs it make it look like two different Files, the pink on the front of the card, and the black pattered Washi Tape on the entire length of the inside card and then also on the Tab.
The Insert of the card is stamped with the words “I’m so grateful there’s you in the world” from the Chalk Talk stamp set, and a flower from “Flower Shop” is heat embossed with Iridescent ice


Cardstock 8 ½” x 5 ½
Card Insert 5 3/8 ” x 3 ½”

Stamp Sets: “Flower Shop”, “Chalk Talk”, and “Shop Around” Wheel
Punches: Pansy
Framelits: Chalk Talk
Ink: White Staz On, Basic Grey
Embossing Power: Iridescent Ice


Tabbed Gift Card Holder

To make the Snowflake, I used the Rock N Roll technique on the Vellum, and whilst the ink was still wet, dipped it in to the Iridescent Ice Embossing Powder, and heat set is with the Heat Tool.
Then layered it with 3 pieces of cardstock {punched with the Blossom punch} that has been put through the Crimper 8 times to distress the cardstock.
Once distressed, I then pulled the cardstock apart gently to create 6 Blossoms.
I added a Rhinestone Basic Jewel to a Candy Dot Brad Base to create the centre of the Snowflake.


Cardstock 11” x 4 ¼”
Score at 2”, 7 ¼”, 7 3/8 “
Punch at 1” and 3 1/4 “

Insert 6 ½ “ 3 ¾ “
Score at 1 ¾ “ 6”

DSP on front (top layer) 8.5cmx7cm
DSP on front (bottom layer) 8cmx6.5cm

Stamp Sets: “Mixed Bunch”, “Season Of Joy” (R)
Punches: Blossom
Ink: Baja Breeze Not Quite Navy
Embossing Power: Iridescent Ice, White


Special Tools: Big Shot, Candy Dot Brad Base, Crimper, Dimensionals, Envelope Punch Board, Heat Tool, Letters To Santa DSP (R),  Rhinestone Basic Jewel, Ribbon, Stampin Around Handle, Vellum, Washi Tape

Licorice Allsorts Slice

Just came across this recipe  from "Wendys Kitchen Table" and just had to share ...


"Licorice Allsorts Slice"


INGREDIENTS250g packet Malt ‘O’ Milk Biscuits125g Butter1/2 can (200g) Sweetened Condensed Milk125g Licorice Allsorts, chopped into small pieces1 1/2 cups Icing Sugar2 tablespoons Cocoa2 teaspoons Butter, melted2-3 tablespoons hot Water


METHODCrush the biscuits in a food processor or with a rolling pin until fine crumbs.Place the biscuits in a bowl and pour in melted butter and sweetened condensed milk. Mix well and then add the licorice allsorts.Press the mixture into a 30cm long rectangular slice pan and allow to set before icing with chocolate icing.To make the icing, combine icing sugar, cocoa, butter and hot water in a bowl and mix until smooth.
Related Posts Plugin for WordPress, Blogger...
Pin It
Blogger Wordpress Gadgets