If
you're anything like me, you absolutely love when BIG opportunities come your
way. And because we all know the Big Shot is a big deal, Stampin' Up! thought
they'd offer you something you couldn't miss; an exclusive Big Shot opportunity
that lasts for the entire month of August!
Stampin' Up! want to put a Big Shot into the hands of
every customer before the holiday catalogue — full of sweet Big Shot
accessories.
That's why with every purchase of a Big Shot in August,
YOU, the customer will receive one of five free stamp set/Framelits bundles
below, of your choice! That's up to a $130 NZD value!!
Not only that, but if you already own a Big
Shot {or Cuttlebug}, you can still purchase these designated bundles at an amazing 15%
off!
This
is one deal you won't want to miss—only available from 1-31 August—as these
bundles are one-time only exclusives.
Two
Choices:
1)
Buy a Big Shot {$179.95 + 5% postage} and getone free bundle
below.
and/or
2)
Buy a discounted bundle below at a 15% discount
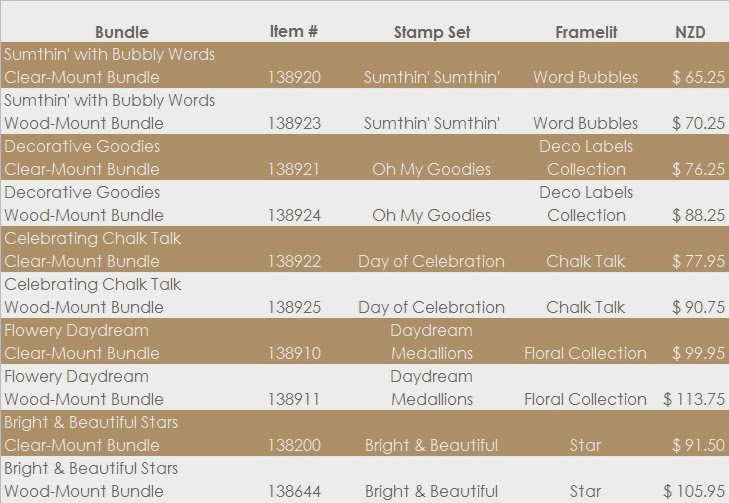
"Bright and Beautiful Stars Bundle:
Clear Mount $91.50, Wood Mount $105.95
Celebrating Chalk Talk Bundle
Clear Mount $77.95, Wood Mount $90.75
"Decorative Goodies Bundle"
Clear Mount $76.25, Wood Mount $88.25
"Flowery Daydream Bundle"
Clear Mount $99.95, Wood Mount $113.75
"Sumthin' With Word Bubbles Bundle"
Clear Mount $65.25, Wood Mount $70.25
So if you
already own a Big Shot or CuttleBug, you can still purchase the above Bundles at
the incredible prices listed.
I am
seriously considering buying a second Big Shot, just for the FREE
Bundle!!!
This week was all about the gorgeous stamp set
“Kinda Eclectic”, this is my favourite stamp set from the new Catty! I like to show the ladies how they can utilise one
Stampin’ Up! product, and use it many different ways. This week we made two greeting cards, which look
completely different from each other.
The first card is a Shaker Window Card, and is
case of a lovely layout by France Martin, however I changed many of the
details, but kept the window {different shape though}, shaker and stamp set the
same. The second card made is all about the “inchies” and
layering, and was my first time using Naturals Cream cardstock {I usually use
Naturals white as my card-bases}. As we had a couple of my favourite ladies absent
this week, I made their cards up for them. When I went to start the remake, I discovered that
quite by accident my sample card had gone home with one of the other ladies, so
ended up making another 3 Shaker Window Cards – phew!
Project 1
”Shaker Window Card”
5 ¾“ x 8 ¼”Bermuda
Bay {Card-Base}, A5 5 5/8” x 3 ¾”Naturals
White x2 5 5/8” x 3 ¾”Pool
Party 5 5/8” x 3 ¾”Acetate 3 ½” x 4 ½”Coastal
Cabana {Window Border} 3 ½“ x 3 ½“Pool
Party {Insert Heart} XtraNaturals
White for the Butterflies
This card is all about tone-on-tone, and features 3
colours that work so well together, Pool Party, Coastal Cabana and Bermuda Bay.
The card-base is Bermuda Bay, with the lining/insert
in Naturals White. On a piece of Naturals White, and using Versamark
and Gold Embossing Powder, stamp and heat emboss the Sun from the “Kinda
Eclectic” stamp set. Add a small circle {3/4”} of “Champagne Glimmer” cardstock
for the centre of the Sun. Then Stamp the leafs in Bermuda Bay ink. Make a packet for the Shaker using a Cellophane Bag
and add “In Color Sequins Assortment” to the packet. Seal and place on top of
the Naturals White Cardstock. Using the Costal Cabana cardstock {3 ½” x 4 ½”},
and using the Labels Collection Framelits, cut a “Label”, then using the next size
down, cut another label inside for the first, to leave a border. Discard the
Label and keep the border. Using the same smaller Framelit {as used above},
cut a hole in the Pool Party Cardstock {5 5/8” x 3 ¾”}. Stamp the leaves in Coastal Cabana around the
cardstock. Through practise {and trial and error!} I
discovered it is better to cut the hole {Label} first, and leave a clean
“Label” to be used in another project, rather than stamp the cardstock first, and
then cut the Label, as this left leaves all over my spare Label! On the Acetate, first use the Emboss Buddy to get
rid of fingerprints etc, then stamp with White StazOn the words “A little
kindness goes a long way” from the “Kinda Eclectic” Stamp set. On the xtra Naturals White cardstock, stamp 4 large
butterflies in Bermuda Bay, and 4 small butterflies in Costal Cabana. Then use
the Elegant Butterfly and Bitty Butterfly Punches to punch out the butterflies. Layer the butterflies, and add 3 small Pearls to
the middle of each butterfly. Now it’s all about the assembly for the front of
the card. You may have to trim the underlying layers to fit. Adhere as follows, Bermuda Bay {card-base}, Naturals
White, Cellophane Packet, Acetate, Pool Party, Coastal Cabana window frame. All of the layers are adhered by tape {or glue if
you’re a glue crafter!}, except for the layer of Pool Party, which adhered with
Dimensionals. Add 3 butterflies to the side of the card at varying
angles.
For the card insert, take the Naturals White cardstock
and using the “Hearts Border” Punch, punch the top, this leaves negative
detail, which when placed over the Bermuda Bay cardstock, you can see the
colour popping through the hearts. Also corner the Naturals White insert with
the “Corner Rounder” Punch Stamp the words “Thank you from the bottom of my
heart” from the “From My Heart” stamp set, in Bermuda Bay on to Pool Party. Use the “Hearts Collection” Framelits to cut a
heart, and add a Pearl to the little swirls at the top and bottom of the heart. Adhere heart to the Naturals White insert, and add
the 4th butterfly to the bottom corner. And finally, adhere the Naturals White insert to
the Bermuda Bay card-base. And as Frenchie would say … “Wah-lah” Shaker Window card done!
Project 1
”Inchies Card”
5 ¾“ x 8 ¼”Soft
Suede {Card-Base}, A5 5 5/8” x 3 ¾”Naturals
Cream x2 XtraSoft
Suede for the Postage Stamps Xtra Naturals
Cream for the Butterflies and 1” Square s 1” x 1”Champaign
Glimmer Paper
Compared with the above card, this was my quick and
easy project.
On Naturals Cream cardstock {5 5/8” x 3 ¾”} offset
the corners, by punching the opposite corners with the Corner Rounder Punch. Add a Candy Dot Brad Base and Pearl to the bottom
right corner. Stamp the words “A little kindness goes a long way”
from the “Kinda Eclectic” Stamp set, in Soft Suede, and adhere to the card-base
with tape {or glue}. Punch 4 postage stamps from the Soft Suede
cardstock, using the “Postage Stamp” Punch. On Naturals Cream cardstock, stamp the leafs in
Soft Suede, 2 large butterflies in Soft Suede and 2 small butterflies in Crumb
Cake {all from the “Kinda Eclectic” Stamp set}. Using the “1” Square”, the “Elegant Butterfly” and
“Bitty Butterfly” Punches, punch 2 x leafs, the butterflies, and well as the
“Champagne Glimmer” Paper. Prepare the “inchies” by layering the 1” squares
with Dimensionals on to the Postage Stamps. With the butterfly, layer together, and then add a
strand of Linen Thread for the antennae. Add a Dimensional and layer on to the
final Postage Stamp. Place the Postage Stamps on to the Naturals Cream cardstock,
and then tape {or glue} down, ensuring that they are all evenly spaced, and
straight!
For the card insert, as above, take the Naturals
Cream cardstock and using the “Hearts Border” Punch, punch the top, this leaves
negative detail, which when placed over the Soft Suede cardstock; you can see
the colour popping through the hearts. Also off-set the corners the Naturals
Cream insert with the “Corner Rounder” Punch to match the front of the card. Stamp the banner dots in Crumb Cake along the
bottom of the cardstock. Add the second butterfly {antennae include!} to the
bottom right corner. Adhere the Naturals Cream insert to the card-base
using tape {or glue}. Wah-lah Inchies Card done!
AND today I unpacked my Christmas pre-order …
Can’t wait to try out these goodies … Stamp sets: "Festival Of Trees", "For
All Things", "Four Feathers", “Holiday Home” Framelits: “Feathers”, “Homemade Holiday”, Card
Thinlits Dies "Snowflake" Punch: “Tree” AND my freebie Hostess stamp set "Good
Greetings". Ahhhh … I’m in heaven!
Recipe Ingredient List
Stamp Sets: “From
My Heart”, “Kinda Eclectic”
Ink:
Bermuda Bay, Coastal Cabana, Crumb Cake, Soft Suede,Versamark, White StazOn
Cardstock: Bermuda Bay, Champagne Glimmer Paper, Coastal
Cabana, Naturals Cream, Naturals White, Pool
Party, Soft
Suede
Thursday was my beautiful daughter JorjaRose’s 11th
birthday, in between Classes, we had family time, and as a treat the kids are
allowed to choose their own take-a-way dinner, this time JR chose Burger King,
and I of course chose #17 “Honey Chicken Noodles” from Noodle Canteen – my fav!
My Mom-In-Law made the B’Day cake, and I decorated
it … what do you think?!!!
1 pack of Maltesers and 1 pack of Pink M&Ms and the kids went crazy!!!
We had 7 little girls come for a sleepover Saturday
night, so had a house full, what with our 2 + 7 extra!
Now on to craft …
Woop woop ... I made a video this week ...
Our first card made this week is called a “Magic Window Card”, and the structure of the Magic Window is a case via
Teri Pocock, click here to view Teri's video Tutorial, however the card design and artistic elements are all my own idea.
The second card made this week features the “Flower
Patch” stamp set, and the layout is a case via Meg Hollandand features the Baby Wipe Technique.
Using the baby Wipe Technique makes
the petals of the flowers so realistic and multi-tonal in colour - ♥♥♥
Project 1” Magic Window Card”
Gatefold Card, finished size is
4”x4”
Measurements For Card Stock: 8" x 4" Crumb Cake Base Card 4" x 2½” Crumb Cake Middle Section 3" x 3" Crumb Cake Window Mechanism
Pieces (x 2)
3¾” x 1¾” Whisper White Side Section (x 2) Measurements For DSP (Designer Series Paper): 3¾”x 1¾” Side Section (x 2)
3¾” x 3¾” Centre Panel 3¾” x 2¼” Middle Section DSP used:In
Colours Paper Stack – Coastal Cabana, Crisp Cantaloupe and Strawberry Slush
Score Base Card at 2” and 6”
Fold side pieces in and this will form the your base card
with the gatefold
Layer the paper mats on to the sections.
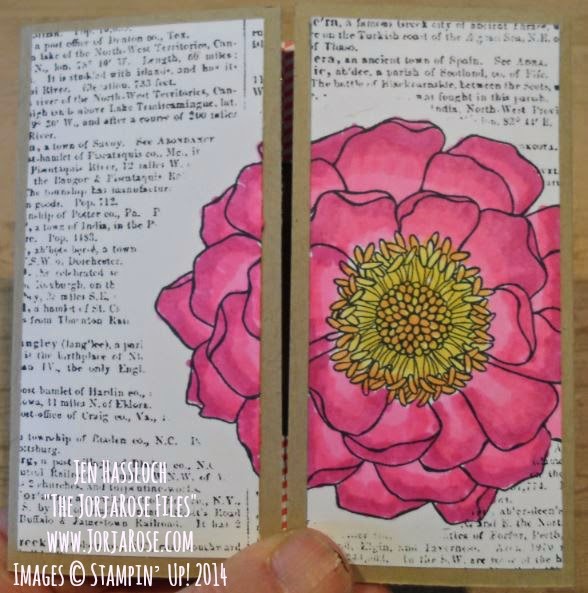
On the Whisper White side sections, mask where the flower is
to be stamped.
Stamp the “Dictionary” stamp set over the mask using Black
StazOn.
Remove mask and stamp the “Blended Bloom” stamp using Tuxedo
Black Momento Ink Pad.
Colour using Blendabilities, Aqua Painters or Watercolour
Pencils.
Calypso Coral + Daffodil Delight and Pumpkin Pie Blendabilitites
Melon Mambo + Daffodil Delight and Pumpkin Pie Blendabilitites
Above Card by Jen Hassloch
Coastal Cabana + Daffodil Delight Blendabilitites
Aqua Painters used with Crisp Cantaloupe, Strawberry Slush and Melon Mambo Ink Pads + Daffodil Delight and Pumpkin Pie Blendabilitites,
Adhere to base card side panels.
Stamp the Window Mechanism{s} with the “Flowering Flourishes”
stamp set in Crumb Cake.
Flip the pieces over and draw a line in pencil at the half
way point at 1 ½”
Measure from the edge 1 1/8” and make a pencil mark.
On the opposite side score down at 1/4”
Cut the cardstock to form the Aperture, cut at the centre
line to the pencil mark, cut in from each corner to the pencil mark, to make a
Pennant shape.
Do the same with both 3’x3’ Window Mechanism pieces.
Complete the centre section; layer the paper mat on to the
cardstock.
Mark the centre point.
Using the “Circles” or “Starburst” Framelits, cut a circle in
the centre of the card, ensuring that the circle is completely centred.
On the Base Card, measure ½” down on each side, ready to add
the Aperture.
Line the Window Mechanism up 1/8” in from the side.
Apply Tombow Glue to the Aperture lightly put in place, on
the edge of the DSP, but do not press down yet, repeat for the other side.
Close the card and check that the lines are horizontal, that
the lines are continuous and one side is not high than the other.
If it looks okay, press down with your bone folder and smooth
down.
Stamp the word “My Friend" from the “Six-Sided Sampler” stamp
set in the centre of the circle of Whisper White cardstock.
Check that the words will fit inside the Aperture.
Use plenty of Tombow Glue {so you get some wiggle time} and
adhere to the card. Move around to ensure you can still see the words through
the Aperture.
Add the centre section of the card. This fits over the
Aperture is and adhered with Tombow Glue.
Before pressing it down make sure that the Diamond or
Aperture is central.
The card-base is Strawberry Slush, with a layer of
Crumb Cake which has been embossed with the “Honeycomb” Embossing Folder.
A second piece of Crumb Cake has been layered over Strawberry
Slush.
Take
a piece of Soft Suede, and punch with the Dotted Scallop Ribbon Punch and layer
this between the Acetate {which has been stamped with White StazOn and the words “Be
You (tiful)”}, and the above layer.
Place the flowers as prepared below on to this layer, and adhere
with Dimensionals and Tape.
Baby Wipe Technique - on a single baby Wipe {I used
Pam’s brand}, drop single drops of “Classic Stampin’ Ink Refills” in Calypso
Coral, Real Red and Strawberry Slush.
You may need to drop a couple of drops of each colour,
until the colours bleed into one another.
Using the big flower from the “Flower Patch” stamp
set, use the baby wipe like an ink pad and stamp on the baby wipe, ensure that
the whole stamp is covered in ink, then stamp down onto the Whisper White
cardstock.
You will need to stamp 3 flowers, and allow to dry.
Keep one flower as the base flower {and cut with
the “Flower Fair” Framelits}.
On the 2nd flower cut the first row of
petals off of the flower.
On the 3rd flower, cut 2 rows of petals
off.
Layer flowers up and secure with an Antique Bard.
The yellow flower is stamped in Daffodil Delight,
allow to dry then stamp the centre of the flower with Black StazOn.
For the smallest flower, stamp with Crisp Cantaloupe, then stamp
with Calypso Coral to the centre, and add some black crystals for the finishing
touch.
The leaves are stamped with Pear Pizzazz as the first layer
and Old Olive as the second layer.
Use the “Flower Fair” Framelits to cut the flowers and leaves
– the Big Shot makes life so much easier!
For the inside of the card, take a piece of Naturals White cardstock
and stamp the words “Happy Blooming Birthday” using the Calypso Coral and Strawberry
Slush Stampin’ Write Markers.
On a piece of Whisper White cardstock, stamp butterflies from
the “Papillion Potpourri” stamp set in Calypso Coral and Strawberry Slush and
punch using the Bitty Butterfly and Elegant Butterfly Punches.
Layer the butterflies and wrap a piece of Linen Tread around
to form the antennae, and adhere with the tape to the inside of the card.
Wah-lah “Flower
Patch” Card featuring the Baby Wipe Technique done!
Ink: Calypso
Coral, Crumb Cake, Crisp Cantaloupe, Daffodil Delight, Melon
Mambo, Old Olive, Pear Pizzazz , Strawberry Slush, Tuxedo Black Momento Ink Pad,
Black StazOn and White StazOn
Blendabilities: Calypso Coral, Coastal Cabana, Daffodil Delight, Melon Mambo and Pumpkin Pie
Stampin’
Write Markers: Calypso Coral and Strawberry Slush
Classic
Stampin’ Ink Refills: Calypso Coral, Real Red and Strawberry Slush
Cardstock:Crumb Cake, Naturals
White, Soft Suede, Whisper White, Designers
Series Paper Stack in Coastal Cabana, Crisp Cantaloupe and
Strawberry Slush
If you're anything like me, you absolutely love when BIG opportunities come your way. And because we all know the Big Shot is a big deal, Stampin' Up! thought they'd offer you something you couldn't miss; an exclusive Big Shot opportunity that lasts for the entire month of August!
Stampin' Up! want to put a Big Shot into the hands of every customer before the holiday catalogue — full of sweet Big Shot accessories.
That's why with every purchase of a Big Shot in August, YOU, the customer will receive one of five free stamp set/framelits bundles below, of your choice! That's up to a $130 NZD value!!
Not only that, but if you already own a Big Shot, they can still purchase these designated bundles at an amazing 15% off!
This is one deal you won't want to miss—only available from 1-31 August—as these bundles are one-time only exclusives.
Two Choices:
1) Buy a Big Shot and get one free bundle below.
and/or
2) Buy a discounted bundle below at a 15% discount.
And don't forget Storage Solutions...
"Shelf
Mantelpieces" by The Sellers Room:
I still have some "Shelf Mantelpieces" by The Sellers Room left, and will order
another batch to be cut.
They
are $15 per set, and are really easy to assemble, please see my Blog post here for more storage
ideas.