Cotton Butterfly

Free background from VintageMadeForYou

Sunday 15 November 2015

Sally and Kathe’s Stampin’ Up! Holiday Catty Launch


Recently {back on Sunday 30th August} Sally and I hosted our second Stampin’ Up! event together, this one was to celebrate the launch of the new Stampin’ Up! Holiday Catalogue.
We had 30 ladies attend, and of course we had to have Prize Patrol again!
And here's our Prize Patrol goodies ...


We had 39 Prize Patrol gifts, some of which were kindly donated – thank you ladies, you know how much we love and appreciate you.

Sally and I taught a project each, plus the ladies all made a Christmas Tag, from the “Oh, What Fun Tag Project Kit”.


In preparation for the big day, Jen and I had made a number of Christmas Cards {we crafted till 3am without a break!!!}, some were case’d from the Catty, some were our own designs.

Sally also made some beautiful samples, and featured the stamp set “Thankful Forest Friends” and the Bundle “Jingle All The Way” ...


Between the two of us, we had a large display of Christmas projects, along with the new SU products from the new Catty {please don’t look at my MasterCard bill!!!} ...


Sally made a number of 3D projects, which were gifts at each of the place settings. 
Here are some of the tables ...


And here are some the gorgeous 3D gifts that Sally made ...


Our afternoon kicked off at 2pm, and we planed to finish around 4pm.
After a brief introduction about the new Catty, Sally and I mentioned our favourite products from the Catty, mine was the “Curvy Corner Trio” Punch, and Sally’s was the “Thankful Forest Friends” stamp set.
We then split the room in half, and both taught our Christmas Cards.


Sally and I had made a gorgeous afternoon tea, Sally made some Cupcake Toppers, featuring the “Thankful Forest Friends” stamp set, and I made my now {in}famous Cheese Ball, which proved to be my undoing later in the day*.
After the yummy afternoon tea, we then swapped, and taught the other half of the room. In the downtime, between projects, the ladies made the Christmas Tag.

Sally Christmas Card was GorJuss!!!  


Sally’s card featured the “Jingle All The Way” Bundle
#140862 Clear Mount $62.95 or #140861 Wood Mount $71.25.

The Bundle consists of the “Jingle All The way” stamp set and “Sleigh Ride” Edgelits, and if purchasing as a set, you save 15%.
The card-base is Blackberry Bliss, and Whisper White cardstock was sponged with Tempting Turquoise, Night of Navy and Blackberry Bliss inks.
Water was then flicked onto the cardstock, which gave a gorgeous effect.
All  3 “Sleigh Ride” Edgelits were cut in Whisper White cardstock, and 2 Way Glue Pen was used to adhere the line of Dazzling Diamonds Stampin’ Glitter.
The sentiment “Merry Everything” and “Jingle All The Way” are stamped in Blackberry Bliss.
This card is a very elegant Christmas Card, and the ladies loved making it, even if their fingertips got a tad inky!
If making this card in bulk I would recommend wearing some silicon/latex gloves.


Built for Free Using: My Stampin Blog

My Christmas Card features the “Peaceful Pines” Bundle
#140850 Photopolymer $92.50


The card-Base is Soft Sky, and the insert Whisper White.
 “Watercolor Wash” in Soft Sky, is stamped on 2/3 of the Vellum, on the reverse side.
Stars from the “Wonderland” stamp set are stamped in VersaMark and heat embossed in Gold.
The Vellum is then sewn {with my real Bernina Sewing Machine!} onto a layer of Whisper White cardstock.
The trees are a mixture of Whisper White, Pear Pizzazz and Old Olive cardstock, and are stamped with Old Olive and Marina Mist inks.
The “Peace” is cut from Gold Foil Sheets and features the “Christmas Greetings” Thinlits.
The star is cut from Gold Glimmer Paper, and is from the “Perfect Pines” Framelits.
Gold Cord is threaded through one of the wooden “Snowflake Elements”.
On the card insert, my favourite new product, the “Curvy Corner Trio” Punch is used on the lower corner.
The sentiment “Wishing a season of wonderful moments and warm memories“ is from the “Peaceful Pines” stamp set, and embossed in gold.
The star is cut from Gold Foil Sheets, and is from the “Perfect Pines” Framelits.
The tree is stamped in Marina Mist, and is from the “Peaceful Pines” stamp set.
Stars from the “Wonderland” stamp set are stamped in VersaMark and heat embossed in Gold.
Wah-lah … Perfect Peaceful Pines Card done!


Built for Free Using: My Stampin Blog

We had a fantastic afternoon, surrounded by all our crafting girlfriends.
The ladies all went home buzzing with the new techniques they had learnt, their two Christmas Cards, a Christmas Tag and Prize Patrol gift{s} + a full belly!!!
AND we can’t wait to do it all over again, with the new Stampin’ Up! Catty, and Sale-A-Bration brochures, which are due for release 6th January 2016.

*At the 4pm mark {I Iooked at my watch so I knew the time!}, I {stupidly} decided to help myself to more of the Cheese Ball and Crackers, and on my return back to the table, and in front of everyone, I BADLY sprained my left ankle, fell to the floor and hit my head!!!   I made such a dick of myself, but refused to cry.
As were at the local rugby club, we had some big and burly {well … the President Duanne} helped me to my feet, and ankle was immediately iced.
It was only later that night when I sat thinking about the day, I realised how fortunate I was that it was just a sprained ankle, as I had my Stampin Up! “Paper Snips”- without the cap on, in the pocket of my crafting apron.
I was incredibly lucky that I didn’t land on the scissors and puncture an organ!

Thank you to my Craftin’ Angel for looking out for me {again}!

Tuesday 13 October 2015

The Life Of Kathe: Who Said Having A Disability Couldn’t Be Fun?!!!


"Who Said Having A Disability Couldn’t Be Fun?!!!"


The time has now come that I need to start using cane!
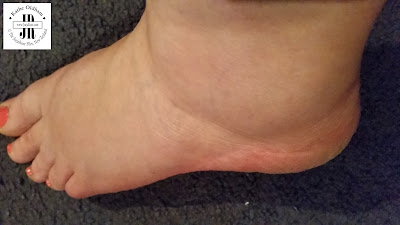
Having Fibromyalgia and Greater Trochanteric Pain Syndrome, along with a badly sprained ankle {we are now 8 weeks +2 days}, I have now resorted to using a Cane to help me get around.


I really wanted a Cane that screamed “Kathe”, and this Cane was perfect for me!
I love the pattern on it, it reminds me of my {many!!!} Jacqui E dresses!


It is height adjustable, and my Physio, Matt from Physio 54 adjusted it to the correct height for me.


Also, it is a folding Cane, which means it can fold up and fit inside my handbag!

Because I am now using the Cane {which my daughter has told ALL her friends about – (she and) they love it!}, I have had to change handbags, so I have gone from my black Kardashian Collection handbag {thank-you AliExpress!}, and reverted back to one of my 10 Kathy Van Zeeland Handbags {thank-you ebay!}. 
The reason for the switch is I needed a longer handle/strap that I can sling over my shoulder, + it is roomer to fit my Cane in!

Sue from Access Mobility was my “Mobility Specialist”, and helped me choose the Cane that reflected my personality, and I am rapt with Cane that I “walked” away with!
After all, “Who Said Having A Disability Couldn’t Be Fun?!!!”

Here are some piccies of my Cankle … cringe!


Cankle Day 1


Cankle Day 2


Cankle Day 4


Cankle Day 4.5


Cankle Day 6


Cankle Day 8


Cankle Day 14


Cankle Day 58 {8 Weeks + 2 days}


Tuesday 6 October 2015

The End Of An Era ...


The end of an era ...

Today the Cook Family Homestead and property sold.
This land has been in the Cook family since 1912, and it is with much sadness that we say goodbye.

My brother's comment says allot ...

"Remember even though the physical has been taken away from us and the great grandchildren to come, the memories, the stories and the love will never be taken away from us".

Thank you for the memories Grandma and Granddad Cook...

This photo is of my grandparents on their wedding day, and is taken back on 3rd December 1947. 


and these photos were taken just before Grandma and Granddad  passed away ...


A book by Sue Murray, was written about our family and the property, entitled 
"Cook Family Chronicles: Early Settlement of Upper Moncks Spur, Mt Pleasant, Christchurch 1912-2012"  ...


and here are some recent photos of the property ...


and finally a "drone" movie ... 


1.39ha (3.43 acres)
Steeped in history and boasting magical views across Christchurch city to the mountains and sea, this is truly something special. 
Purchased in 1912 the property has remained in the family until now. As well as being used as a military base throughout WWII, the property also boasts an original army hut. 
Modest in design the home offers potential plus with a character filled kitchen/dining at its heart. With sliding doors connecting the space to the decked verandah outside, the room is flooded with natural light and amazing views morning and night. 
Found adjacent is the living area. With built-in cabinetry and timber joinery throughout it offers a warm and neutral canvas on which modern day family life can play out. 
A Masport log fire ignites notions of cozy nights in. 
Four bedrooms and one bathroom ensure there is a private retreat for every family member. 
Able to enjoy the view from bed, the master bedroom has touches of luxury with sliding doors to the verandah and a separate toilet. 
A separate laundry with external access completes the floor plan. 
Sheltered from the elements by mature plantings, macrocarpa and olearia hedging, also a stand of pine trees planted for firewood. 
The house and surrounding 1.39ha is comprised of five paddocks. Perfect for those with a love of space or looking to run stock. 
A mature garden connects the home with surrounding pasture. 
Ticking all the boxes for outdoor utilities is a wood shed, small hut, garden shed, hay shed, glasshouse and old army hut. The army hut was given to the family by the army as compensation for the use of the land. 
An external access single garage is also found on the property.
Without a doubt this is a property all about location, location, location. With unbelievable views it is something you have to see to believe. 

Have you fallen in love with the Cook Homestead yet?

Friday 25 September 2015

I Just Met Nadia Lim, MasterChef 2011 Winner!!!


Nadia Lim, MasterChef 2011 Winner


This evening I had the great pleasure of meeting Nadia Lim, MasterChef 2011 winner, and author of 4 cook books!
The event was hosted at Petite Fleur at Seifried Estate, in Richmond, Tasman.
I won a ticket with a Richmond Mall promotion, and was all ready dressed {in my new Jacqui e dress} and ready to go by 11am {the event started at 6.45pm!!!}!!!
I went with my very good friend Tracy, and a couple of her workmates, and we had such a great evening ...


On arrival there was a glass of wine each, and 2 platters per table.


We had a goodie bag at each place setting, which had 2 magazines “New Zealand Taste” and “WildTomato” inside, along with a number of sampler products from local shops around Richmond, including a glue stick {from Paper Plus} and a coffee card from Muffin Break ...


Anna from Paper Plus was the MC for the evening, or “Oprah” as Nadia called her, and Nadia was an amazing speaker, and I went home buzzing with excitement.
As I had {another} meeting with my Dietician Tonia earlier this week, allot of the lingo that Nadia used I was familiar with, as I have been asked by Tonia to start the "FODMAP Diet" {"Fermentable Oligo-Di-Monosaccharides and Polyols", FODMAPs are carbohydrates (sugars) that are found in foods}.
Nadia talked about how at the age if 12, she decided that she would be a food author, and marry her idol “The Naked Chef” Jamie Oliver!
Years later the first part of Nadia’s dream came true, the later part, well unfortunately Jamie married his sweetheart Jools!
We could have listened for hours as Nadia spoke about meeting her mother-in-law for the first time, and her faux pax made on live TV when recounting that first meeting, along with many other antidotes.
There was a question and answer session that must have lasted at least 30 minutes, and Nadia handled each question with ease, and I loved that she repeated what the question was {as she had a microphone} before relaying her very informative answer.
All too soon, the evening was drawing to a close, but not before we had the opportunity to purchase Nadia’s cook books at a discounted price, and also get a signed autograph from Nadia and a selfie!


I purchased her latest book “Nadia Lims’ Fresh Start Cook Book” over 100 delicious everyday recipes for lasting good health and weight loss.
My favourite recipes thus far, as I thumb through the book are “Grilled Cinnamon Bananas With Maple Caramelised Pecans + Yoghurt”, “Salted Caramel Fudge”, “Strawberry, Basil + Lime Sorbet” and ohhhhh yum “Chocolate Berry Fudge Brownies”!
As you can tell, I have a sweet tooth {not good when you are meant to be on a low sugar diet!}, but Nadia’s most recent book also has recipes for Breakfast, Lunch, Dinner, Vegetarian, Meat, Chicken, Fish + Seafood, Desserts + Treats, Healthy Snacks, and Essentials.
With a background studying nutrition and dietetics for five years at Otago University, Nadia is more than qualified to offer advice on nutrition, and share her love of food.
If you get the chance, take a look at Nadia’s website www.nadialim.com or better yet, pop into your local bookshop or library and pick up a copy of one of Nadia’s books: “Nadia’s Kitchen”, “Nadia Lim’s Good Food Cook Book”, “Easy Week Night Meals” {included in the book is her famous “Thyme Stuffed Chicken With Roast Pumpkin and Mushroom Sauce" recipe} + her latest book “Nadia Lims’ Fresh Start Cook Book”.


WOWsiers, what a night!


Nadia’s Cook Books may be purchased through her website www.nadialim.com or through any good book seller.


Wednesday 9 September 2015

The Most Divine Cheese Ball EVER …


The Most Divine Cheese Ball EVER …

I recently borrowed this yummy recipe from a friend, and then switched up the ratios/volumes!

250g Cream Cheese, diced/cubed {Philadelphia is perfect, but NOT diet/lite or spreadable}
1 Cup Cheese, grated {Edam is perfect}
1 Red Onion, diced
125ml {1/2 Cup} Sweet Chili Sauce {ended up accidentally using half the bottle!!!}
Slivered Almonds

Make the Cheese Ball the night before it is to be consumed!

Leave the Cream Cheese out of the fridge for 2 hours to soften, and then dice/cube.
Grate the Cheese.
Mix in a bowl all ingredients {except the Slivered Almonds}, stir with a wooden spoon until all ingredients combined.
Split the BIG Cheese Ball ingredients into two, as this recipe makes enough for two Cheese Balls.
Spread the Slivered Almonds on to a dinner plate, and then roll the Cheese Ball, until covered entirely with Slivered Almonds.
Place Cheese Ball in a serving bowl, cover with cling wrap, and refrigerate overnight.
Serve with Crackers {the “Peckish” brand is soooo yummy!}, Carrot Sticks, Celery Sticks etc.


I have to admit the last Cheese Ball{s} I made was Friday night, for my S#@$%&Y Party on Saturday. The second Cheese Ball was left in the fridge, and I ended up eating the WHOLE Cheese Ball, along with a WHOLE packet of crackers on Monday night @ midnight.
WARNING … once you start eating the Cheese Ball, it’s very hard to stop!
Enjoy!


Related Posts Plugin for WordPress, Blogger...
Pin It
Blogger Wordpress Gadgets